https://arxiv.org/pdf/2305.15717
模型模仿的虚假承诺:开源大语言模型的发展困境与出路
近年来,随着ChatGPT等商业大语言模型的崛起,开源社区兴起了一股"模型模仿"浪潮。许多研究者试图通过让开源模型学习商业模型的输出来快速提升性能,诞生了Alpaca、Vicuna等知名项目。然而,加州大学伯克利分校的最新研究表明,这种看似经济高效的方法可能是一个"虚假承诺"。
什么是模型模仿?
模型模仿是指使用商业模型(如ChatGPT)的API输出作为训练数据,对开源模型进行微调,以期达到与商业模型相似的性能。这种方法的吸引力在于:
- 成本低廉:无需从头训练大模型或标注大量数据
- 技术门槛低:只需收集API输出并进行监督学习
- 效果显著:初步评估显示模型质量大幅提升
研究团队将模型模仿分为两类:
- 任务特定模仿:针对特定领域或任务进行模仿
- 广泛覆盖模仿:试图全面复制目标模型的各种能力
基于大模型的外卖词槽提取完整方案
1. 方案概述
你的词槽提取任务属于典型的**意图识别+槽位填充(Intent Detection & Slot Filling)**问题。这是NLP中的核心任务,目标是从用户对话中识别不同的槽位,对应用户查询的不同参数。对于外卖场景,需要处理复杂的商业逻辑和多轮对话。
核心挑战
- 店铺名与商品名混淆:如"乡村的小鸡"中"乡村"是店铺,"小鸡"是商品
- 多意图场景:外卖下单、再来一单、搜索店铺等不同意图需要不同词槽
- 归一化要求:地址标签、配送方式等需要统一格式
- 业务逻辑复杂:必选词槽、默认值、校验规则等
https://arxiv.org/pdf/2507.05934
BlueLM-2.5-3B: 边缘设备上的多模态推理突破
核心创新与技术亮点
BlueLM-2.5-3B代表了多模态大语言模型(MLLM)在边缘设备部署方面的重要突破。作为首个支持thinking和non-thinking双模式切换的3B级别MLLM,该模型在保持紧凑性的同时实现了卓越的推理能力。
Q:如何训练超长上下文的大模型?显存不够用怎么办,现在的技术手段是如何让这个训练超长上下文大模型的事情变得可行的?
超长上下文的大模型训练
引言
随着大语言模型的快速发展,处理超长文档、长对话历史和复杂推理任务的需求日益增长。从最初的512 token到现在的百万token级别上下文,这一技术突破不仅改变了模型的应用边界,也带来了前所未有的技术挑战。
本文将深入探讨超长上下文大模型的训练技术,从基础概念到前沿方法,带你了解这个激动人心的研究领域。
超长上下文的挑战
计算复杂度问题
标准Transformer的自注意力机制计算复杂度为O(N²),其中N是序列长度。当上下文长度从4K增加到1M时,计算量增长了约62,500倍:
展开代码计算复杂度对比:
4K tokens: O(4,096²) ≈ 16.8M 操作
1M tokens: O(1,048,576²) ≈ 1.1T 操作
增长倍数: ~65,536倍
内存需求分析
对于一个具有h个注意力头、d维隐藏状态的模型,KV缓存的内存需求为:
KV Cache内存公式:
展开代码Memory_KV = N × d × 2 × h × precision_bytes × batch_size
以70B参数模型为例(假设d=4096, h=32, precision=FP16):
python展开代码def calculate_kv_memory(seq_len, hidden_dim=4096, num_heads=32,
                       precision_bytes=2, batch_size=1):
    """计算KV缓存内存需求"""
    memory_gb = (seq_len * hidden_dim * 2 * num_heads *
                precision_bytes * batch_size) / (1024**3)
    return memory_gb

# 不同序列长度的内存需求
lengths = [4096, 16384, 65536, 262144, 1048576]
for length in lengths:
    memory = calculate_kv_memory(length)
    print(f"{length:>7} tokens: {memory:>6.2f} GB")
输出结果显示内存需求的急剧增长:
展开代码4096 tokens: 2.00 GB 16384 tokens: 8.00 GB 65536 tokens: 32.00 GB 262144 tokens: 128.00 GB 1048576 tokens: 512.00 GB
https://arxiv.org/abs/2505.21549
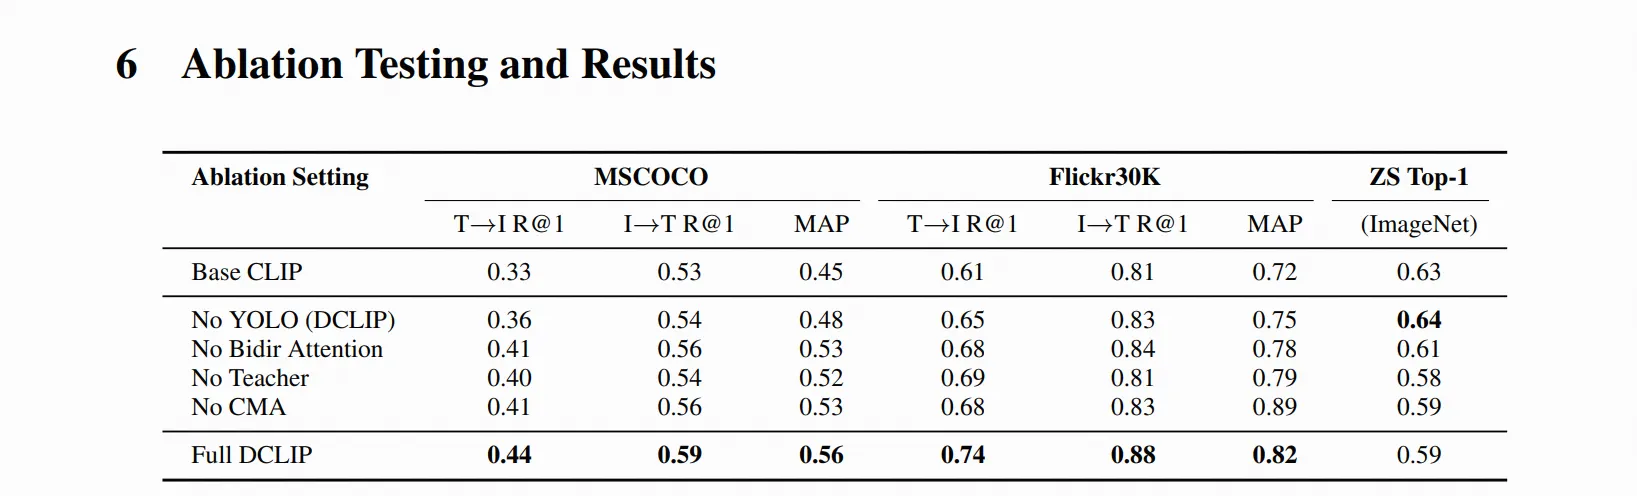
论文总结:Distill CLIP (DCLIP):通过跨模态Transformer蒸馏增强图像-文本检索
研究背景与动机
CLIP模型在零样本分类方面表现优异,但在需要细粒度跨模态理解的检索任务中存在局限性,主要因为其依赖固定图像分辨率和有限上下文。DCLIP旨在解决这一问题,既要提升多模态图像-文本检索性能,又要保持原始CLIP模型强大的零样本分类能力。
核心方法
DCLIP采用元教师-学生蒸馏框架:
-
元教师设计:
- 使用YOLOv8x提取图像区域特征
- 通过双向跨模态注意力机制融合YOLO提取的图像区域和相应文本片段
- 生成语义和空间对齐的全局表示
-
学生模型:
- 采用轻量级设计,仅对CLIP的图像编码器进行微调
- 文本编码器保持冻结,维持与原始CLIP语义空间的对齐
- 通过混合损失函数学习(对比学习+余弦相似度目标)
-
非对称架构:
- 只适应图像编码器,文本编码器保持不变
- 这种设计防止模型通过平凡对齐走捷径,并将学习的图像特征锚定到CLIP的潜在空间
实验设置与数据
- 训练数据:仅使用约67,500个样本(来自MSCOCO、Flickr30k和Conceptual Captions)
- 模型规模:支持ViT-B/32、ViT-B/16、ViT-L/14等不同backbone
- 评估指标:Recall@K、MAP(检索);Top-1/Top-5准确率(零样本分类)
https://huggingface.co/meituan-longcat/LongCat-Flash-Thinking
LongCat-Flash-Thinking 技术报告摘要
模型概述
LongCat-Flash-Thinking 是美团LongCat团队开发的560亿参数开源混合专家(MoE)推理模型,平均激活参数为270亿。该模型专门为增强推理能力而设计,在数学、编程、智能代理和形式化推理等领域表现出色。
训练方法
预训练(3阶段)
- 通用阶段:30万亿tokens,建立基础知识
- 推理阶段:5万亿高质量tokens,增强STEM和编程能力
- 长上下文阶段:扩展上下文长度至32K tokens
后训练(4阶段流程)
- 长CoT冷启动:建立基础推理模式
- 推理强化学习:优化数学和编程推理
- 思维模式融合:整合两种模式
- 通用强化学习:提升综合能力
Qwen团队在X post中解释停止使用混合思维模式的原始帖子地址是:https://x.com/Alibaba_Qwen/status/1947344511988076547
上nature了: https://www.nature.com/articles/s41586-025-09422-z
我之前的一个文章介绍: https://www.dong-blog.fun/post/2014
DeepSeek-R1的完整训练流程
1. DeepSeek-R1-Zero(纯强化学习路线)
DeepSeek-R1-Zero 也是一个重要成果,纯强化学习路线也是可以走的。
基础:直接基于DeepSeek-V3 Base模型 核心特点:
- 完全跳过SFT阶段 - 这是关键差异
- 仅使用GRPO进行大规模强化学习
- 只用规则基础奖励(准确率+格式奖励)
- 训练10,400步,历时1.6个训练周期
结果:
- 在AIME数学竞赛上从15.6%提升到77.9%
- 自然涌现Long-CoT能力(长链思维推理)
- 出现"aha moment"现象(突然大量使用"wait"等反思词汇)
- 但存在可读性差、语言混杂等问题
这问题困扰我很久,在评论管理页面无法看到管理。
最终才发现我登录Waline不是管理员身份导致的。需要修改数据库的表是最佳最快的解决办法。
bash展开代码docker ps # 查看mongo数据库的容器ID

# 进入 MongoDB 容器
docker exec -it <mongo容器ID> mongosh

# 切换到 waline 数据库
use waline

# 查看有哪些集合
waline> show collections
Comment
Users