目录
读取与显示
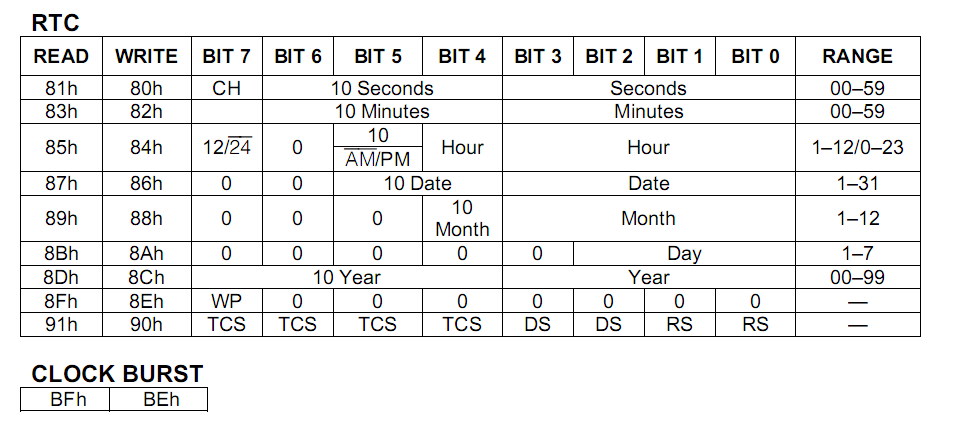
Burst模式连续读取到DS1302数组,存放顺序是 秒、分、时、日、月、周、年。
这段代码是一个嵌入式系统的程序,用于控制一个基于MSP430微控制器的时钟显示器。下面是代码的解释:
#include 部分是引入了所需要的头文件,包括MSP430微控制器的库、ds1302驱动以及LCD显示器的库。
void main(void) 是主函数的定义,程序从这里开始执行。
WDTCTL = WDTPW + WDTHOLD; 关闭了看门狗定时器,防止系统复位。
P1DIR = 0xFF; 和 P2DIR = 0xFF; 设置了P1和P2端口为输出模式。
P2OUT = 0x00; 和 P1OUT = 0x00; 将P1和P2端口的输出初始化为0。
delay_ms(200); 是一个延时函数,延时200毫秒。
LCD_init(); 初始化LCD显示器。
P5DIR = 0xFF; 和 P5SEL = 0; 设置了P5端口为输出模式。
TimeData 数组存储了时间和日期信息,依次表示秒、分、时、日、月、年和星期。
Init_DS1302(); 初始化ds1302实时时钟模块。
while (1) 是一个无限循环,程序将会在此处一直运行。
Read_DS1302_Time(DS1302_R_ADDR) 从ds1302模块读取时间和日期,并将其存储在TimeData数组中。
LCD_dsp_string(0, 1, disp); 在第一行显示日期信息。
LCD_dsp_string(0, 2, disp); 在第二行显示时间信息。
TimeData[5]=getWeekdayByYearday(2000+TimeData[6],TimeData[4],TimeData[3]); 计算当前日期对应的星期几,并将结果保存在TimeData[5]中。
switch (TimeData[5]) 根据TimeData[5]的值选择相应的星期字符串,在第二行的特定位置显示。
delay_ms(500); 延时500毫秒。
以上就是代码的大致解释。该程序通过读取ds1302实时时钟模块的数据,将时间和日期显示在LCD上,并且还会显示当前日期对应的星期几。循环执行,实现了时钟的实时更新。
c展开代码void main(void)
{
    char cnt=0;
    unsigned char disp[16];
    WDTCTL = WDTPW + WDTHOLD; /* 关闭看门狗 */
    P1DIR = 0xFF; /* 设置方向 */
    P1SEL = 0; /* 设置为普通I/O 口 */
    P2DIR = 0xFF; /* 设置方向 */
    P2SEL = 0; /* 设置为普通I/O 口 */
    P2OUT = 0x00;
    P1OUT = 0x00;
    delay_ms(200);
    LCD_init();
//    LCD_dsp_string(1, 1, "QQ742971636");
    DS1302[0]=58;//秒
    DS1302[1]=59;//分
    DS1302[2]=23;//时
    DS1302[3]=31;//日
    DS1302[4]=1;//月
    DS1302[6]=0;//年
    DS1302[5]=1;//星期
    Init_DS1302();
    while (1)
    {
        Read_DS1302_Burst_Mode();
        cnt=0;
        disp[cnt++]=DS1302[6]/10+'0';
        disp[cnt++]=DS1302[6]%10+'0';
        disp[cnt++]='-';
        disp[cnt++]=DS1302[4]/10+'0';
        disp[cnt++]=DS1302[4]%10+'0';
        disp[cnt++]='-';
        disp[cnt++]=DS1302[3]/10+'0';
        disp[cnt++]=DS1302[3]%10+'0';
        disp[cnt++]=0;
        LCD_dsp_string(0, 1, disp);
        cnt=0;
        disp[cnt++]=DS1302[2]/10+'0';
        disp[cnt++]=DS1302[2]%10+'0';
        disp[cnt++]=':';
        disp[cnt++]=DS1302[1]/10+'0';
        disp[cnt++]=DS1302[1]%10+'0';
        disp[cnt++]=':';
        disp[cnt++]=DS1302[0]/10+'0';
        disp[cnt++]=DS1302[0]%10+'0';
        disp[cnt++]=0;
        LCD_dsp_string(0, 2, disp);
        switch(DS1302[5])
        {
            case 1:  LCD_dsp_string(12, 2, "MON");break;
            case 2:  LCD_dsp_string(12, 2, "TUE");break;
            case 3:  LCD_dsp_string(12, 2, "WED");break;
            case 4:  LCD_dsp_string(12, 2, "THU");break;
            case 5:  LCD_dsp_string(12, 2, "FRI");break;
            case 6:  LCD_dsp_string(12, 2, "SAT");break;
            case 7:  LCD_dsp_string(12, 2, "SUN");break;
        }
        delay_ms(100);
    }
}
仿真图:

DS1302寄存器介绍
写入0x80到0x8c即可。
液晶显示代码
这段代码是为了控制液晶屏(LCD1602)显示内容的函数库。主要包括以下几个函数:
LCD_write_command(unsigned char command):向液晶屏写入指令的函数。
LCD_write_dat(unsigned char dat):向液晶屏写入数据的函数。
LCD_set_xy(unsigned char x, unsigned char y):设置液晶屏的显示位置。
LCD_dsp_char(unsigned char x, unsigned char y, char dat):在指定位置显示一个字符。
LCD_dsp_string(unsigned char X, unsigned char Y, char *s):在指定位置显示一个字符串。
LCD_init(void):初始化液晶屏。
其中,定义了一些接口和函数的宏,如LCDIO、LCD1602_RS_1等。这些宏定义用于控制具体的引脚和功能。
代码中还有一个LCD_check_busy()函数,用于检查液晶屏是否忙于执行操作,但实践证明该函数在某些液晶屏上不能正常使用,因此没有再使用该函数。
整体来说,这段代码实现了对液晶屏的基本操作,包括写入指令和数据、设置显示位置和显示内容等。通过调用这些函数,可以实现控制液晶屏显示不同的内容。
c展开代码#include "LCD.h"
#include <string.h>
/**************定义接口************************/
#define LCDIO       P1OUT
#define LCD1602_RS_1    P2OUT   |= 1
#define LCD1602_RS_0    P2OUT   &=~1
#define LCD1602_RW_1    P2OUT   |= 2
#define LCD1602_RW_0    P2OUT   &=~2
#define LCD1602_EN_1    P2OUT   |= 4
#define LCD1602_EN_0    P2OUT   &=~4
/**************定义函数************************/
void LCD_write_command(unsigned char command); /* 写入指令函数 */
void LCD_write_dat(unsigned char dat); /* 写入数据函数 */
void LCD_set_xy(unsigned char x, unsigned char y); /* 设置显示位置函数 */
void LCD_dsp_char(unsigned char x, unsigned char y, char dat); /* 显示一个字符函数 */
void LCD_dsp_string(unsigned char X, unsigned char Y, char *s); /* 显示字符串函数 */
void LCD_init(void); /* 初始化函数 */
/*******检查忙函数*************/
void LCD_check_busy() /* 实践证明,在我的LCD1602上,检查忙指令通过率极低,以 */
{ /* 至于不能正常使用LCD。因此我没有再用检查忙函数。而使 */
    P1DIR = 0x00;
    LCDIO = 0xff;
    LCD1602_RS_0; /* 要用200次循环便能完成。 */
    LCD1602_RW_1;
    LCD1602_EN_1;
    while (P1IN & 0x80)
        ;
    LCD1602_EN_0;
    P1OUT = 0x00;
    P1DIR = 0xFF;
}
/******************************/
/**************写指令函数********************************/
void LCD_write_command(unsigned char command)
{
    /* LCD_check_busy(); //加上这句仿真无法通过 */
    LCD1602_RS_0;
    LCDIO = command;
    LCD1602_EN_1;
    /* delay_ms(1); */
    LCD1602_EN_0;
    delay_ms(1);
}
/***************************************************/
/****************写数据函数************************/
void LCD_write_dat(unsigned char dat)
{
    /* LCD_check_busy();  //加上这句仿真无法通过 */
    LCD1602_RS_1;
    LCDIO = dat;
    LCD1602_EN_1;
    /* delay_ms(1); */
    LCD1602_EN_0;
    delay_ms(1);
    LCD1602_RS_0;
}
/****************************************************/
/***************设置显示位置**************************/
void LCD_set_xy(unsigned char x, unsigned char y)
{
    unsigned char address;
    if (y == 1)
        address = 0x80 + x;
    else if (y == 2)
    {
        address = 0x80 + 0x40 + x;
    }
    LCD_write_command(address);
}
/***************************************************/
/****************显示一个字符**********************/
void LCD_dsp_char(unsigned char x, unsigned char y, char dat)
{
    LCD_set_xy(x, y);
    LCD_write_dat(dat);
}
/**********************************************/
/***************显示字符串函数***************/
void LCD_dsp_string(unsigned char X, unsigned char Y, char *s)
{
    uchar len, List;
    len = strlen(s);
    LCD_set_xy(X, Y);
    for (List = 0; List < len; List++)
        LCD_write_dat(s[List]);
}
/**************************************/
/************初始化函数****************/
void LCD_init(void)
{
    LCD1602_RW_0;
    LCD1602_EN_0;
    /* CLEARSCREEN;//clear screen */
    LCD_write_command(0x38); /* set 8 bit data transmission mode */
    delay_ms(1);
    LCD_write_command(0x38); /* set 8 bit data transmission mode */
    delay_ms(1);
    LCD_write_command(0x38); /* set 8 bit data transmission mode */
    delay_ms(1);
    LCD_write_command(0x06); /* open display (enable lcd display) */
    delay_ms(1);
    LCD_write_command(0x0C); /* set lcd first display address */
    delay_ms(1);
    LCD_write_command(0x01); /* clear screen */
    delay_ms(1);
    /*
     * LCD_write_command(0x80);//clear screen
     * delay_ms(1);
     */
}
全部源码
源码:http://dt2.8tupian.net/2/28880a14b9990.pg3
帮助、问询
csharp展开代码https://docs.qq.com/sheet/DUEdqZ2lmbmR6UVdU?tab=BB08J2


本文作者:Dong
本文链接:
版权声明:本博客所有文章除特别声明外,均采用 CC BY-NC。本作品采用《知识共享署名-非商业性使用 4.0 国际许可协议》进行许可。您可以在非商业用途下自由转载和修改,但必须注明出处并提供原作者链接。 许可协议。转载请注明出处!