目录
- Qwen2-VL GitHub项目:Qwen2-VL
- Qwen2-VL-7B-Instruct Hugging Face模型仓库:Qwen2-VL-7B-Instruct
vllm 的 api方式 【显存占用有问题】
启动镜像并安装必要环境
首先,使用以下命令启动 Docker 镜像,并挂载指定目录到容器中:
bash展开代码docker run --gpus all -it --shm-size 16G --rm -v /root/xiedong/Qwen2-VL-7B-Instruct:/Qwen2-VL-7B-Instruct --net host qwenllm/qwenvl:2-cu121 bash
接下来,在容器内安装必要的依赖包:
bash展开代码pip install git+https://github.com/huggingface/transformers@21fac7abba2a37fae86106f87fcf9974fd1e3830
pip install accelerate
pip install -U qwen-vl-utils

# 根据你的 CUDA 版本安装 vllm
CUDA_VERSION=cu121
pip install 'vllm==0.6.1' --extra-index-url https://download.pytorch.org/whl/${CUDA_VERSION}
启动 API 服务
在完成环境配置后,启动 API 服务:
bash展开代码python -m vllm.entrypoints.openai.api_server --served-model-name Qwen2-VL-7B-Instruct --model /Qwen2-VL-7B-Instruct
关于 max_pixels 参数的说明
max_pixels 是 Qwen2-VL 模型处理图像时的重要参数,指定模型在推理过程中允许处理的图像最大像素数。它用于在性能与计算资源消耗之间取得平衡。模型支持多种分辨率输入,默认使用原始分辨率。然而,较高的分辨率尽管能够提升性能,却需要更多的计算资源。
用户可以通过设置 min_pixels 和 max_pixels 来控制图像的大小范围,以达到平衡速度和内存使用的最佳效果。例如,设定令牌数范围为 256-1280,可以适用于不同需求。
定义 min_pixels 和 max_pixels
下面的代码示例展示了如何使用 min_pixels 和 max_pixels 参数初始化处理器:
python展开代码from transformers import AutoProcessor

# 定义最小和最大像素数
min_pixels = 256 * 28 * 28
max_pixels = 1280 * 28 * 28

# 使用 min_pixels 和 max_pixels 初始化处理器
processor = AutoProcessor.from_pretrained(
    "Qwen/Qwen2-VL-7B-Instruct",
    min_pixels=min_pixels,
    max_pixels=max_pixels
)

# 输出 min_pixels 和 max_pixels 的值
print(min_pixels)  # 200704
print(max_pixels)  # 2007040
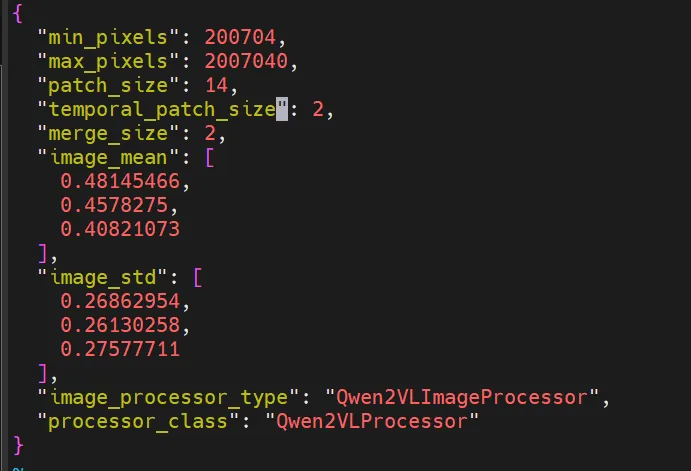
min_pixels 和 max_pixels 参数也可以在 preprocessor_config.json 配置文件中进行调整:
显存占用问题
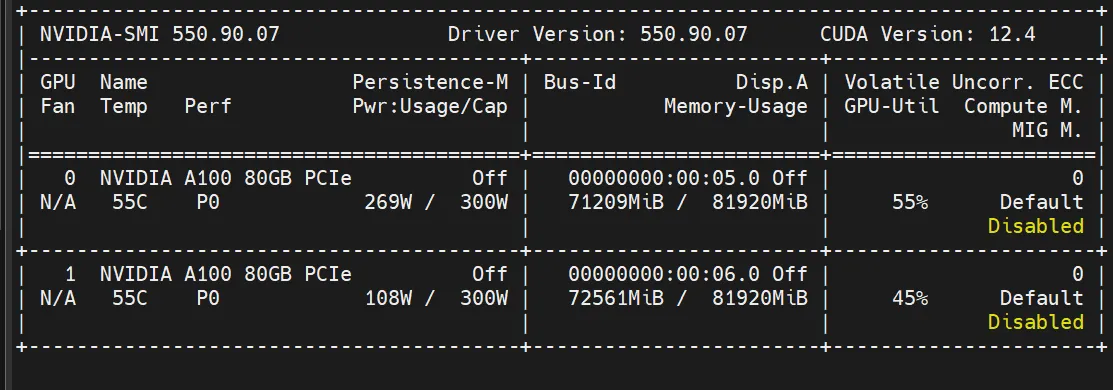
通过测试发现,模型加载后显存占用较高,达到了 65677MiB,如下图所示:

即使对配置文件中的 min_pixels 和 max_pixels 进行调整,显存占用依然较高。这可能是由 vllm.entrypoints.openai.api_server 中的潜在 bug 导致的。
也不是BUG,是因为max_pixels引起的,不知道如何设置max_pixels,此路不通。 preprocessor_config.json 配置文件没有作用。
7B transformers 的测试
测试图片2048*1365像素。
测试1
测试条件: 不用flash_attention_2; min_pixels = 256 * 28 * 28 max_pixels = 2560 * 28 * 28
测试代码:
python展开代码import time

import torch
from transformers import Qwen2VLForConditionalGeneration, AutoTokenizer, AutoProcessor
from qwen_vl_utils import process_vision_info
import gc

# default: Load the model on the available device(s)
model = Qwen2VLForConditionalGeneration.from_pretrained(
    "/Qwen2-VL-7B-Instruct", torch_dtype="auto", device_map="auto"
)

# We recommend enabling flash_attention_2 for better acceleration and memory saving, especially in multi-image and video scenarios.
# model = Qwen2VLForConditionalGeneration.from_pretrained(
#     "Qwen/Qwen2-VL-7B-Instruct",
#     torch_dtype=torch.bfloat16,
#     attn_implementation="flash_attention_2",
#     device_map="auto",
# )

# default processer
# processor = AutoProcessor.from_pretrained("Qwen/Qwen2-VL-7B-Instruct")

# The default range for the number of visual tokens per image in the model is 4-16384.
# You can set min_pixels and max_pixels according to your needs, such as a token range of 256-1280, to balance performance and cost.
min_pixels = 256 * 28 * 28
max_pixels = 2560 * 28 * 28
processor = AutoProcessor.from_pretrained("/Qwen2-VL-7B-Instruct", min_pixels=min_pixels, max_pixels=max_pixels)

messages = [
    {
        "role": "user",
        "content": [
            {
                "type": "image",
                "image": "/Qwen2-VL-7B-Instruct/demo.jpeg",
            },
            {"type": "text", "text": "Describe this image."},
        ],
    }
]

# 定义执行次数
num_runs = 20

# 记录总时间
total_time = 0

for _ in range(num_runs):
    start_time = time.time()

    # Preparation for inference
    text = processor.apply_chat_template(
        messages, tokenize=False, add_generation_prompt=True
    )
    image_inputs, video_inputs = process_vision_info(messages)
    inputs = processor(
        text=[text],
        images=image_inputs,
        videos=video_inputs,
        padding=True,
        return_tensors="pt",
    )
    inputs = inputs.to("cuda")

    # Inference: Generation of the output
    generated_ids = model.generate(**inputs, max_new_tokens=128)
    generated_ids_trimmed = [
        out_ids[len(in_ids):] for in_ids, out_ids in zip(inputs.input_ids, generated_ids)
    ]
    output_text = processor.batch_decode(
        generated_ids_trimmed, skip_special_tokens=True, clean_up_tokenization_spaces=False
    )
    print(output_text)

    gc.collect()
    torch.cuda.empty_cache()

    # 记录执行时间
    total_time += time.time() - start_time

# 计算并打印平均时间
average_time = total_time / num_runs
print(f"Average execution time over {num_runs} runs: {average_time:.2f} seconds")
显存占用24G,如下图所示:

测试结果:
Average execution time over 20 runs: 5.22 seconds
测试2
测试条件:
- 不用flash_attention_2;
- min_pixels = 256 * 28 * 28
- max_pixels = 1280 * 28 * 28
测试代码:
python展开代码import time

import torch
from transformers import Qwen2VLForConditionalGeneration, AutoTokenizer, AutoProcessor
from qwen_vl_utils import process_vision_info
import gc

# default: Load the model on the available device(s)
model = Qwen2VLForConditionalGeneration.from_pretrained(
    "/Qwen2-VL-7B-Instruct", torch_dtype="auto", device_map="auto"
)

# We recommend enabling flash_attention_2 for better acceleration and memory saving, especially in multi-image and video scenarios.
# model = Qwen2VLForConditionalGeneration.from_pretrained(
#     "Qwen/Qwen2-VL-7B-Instruct",
#     torch_dtype=torch.bfloat16,
#     attn_implementation="flash_attention_2",
#     device_map="auto",
# )

# default processer
# processor = AutoProcessor.from_pretrained("Qwen/Qwen2-VL-7B-Instruct")

# The default range for the number of visual tokens per image in the model is 4-16384.
# You can set min_pixels and max_pixels according to your needs, such as a token range of 256-1280, to balance performance and cost.
min_pixels = 256 * 28 * 28
max_pixels = 1280 * 28 * 28
processor = AutoProcessor.from_pretrained("/Qwen2-VL-7B-Instruct", min_pixels=min_pixels, max_pixels=max_pixels)

messages = [
    {
        "role": "user",
        "content": [
            {
                "type": "image",
                "image": "/Qwen2-VL-7B-Instruct/demo.jpeg",
            },
            {"type": "text", "text": "Describe this image."},
        ],
    }
]

# 定义执行次数
num_runs = 20

# 记录总时间
total_time = 0

for _ in range(num_runs):
    start_time = time.time()

    # Preparation for inference
    text = processor.apply_chat_template(
        messages, tokenize=False, add_generation_prompt=True
    )
    image_inputs, video_inputs = process_vision_info(messages)
    inputs = processor(
        text=[text],
        images=image_inputs,
        videos=video_inputs,
        padding=True,
        return_tensors="pt",
    )
    inputs = inputs.to("cuda")

    # Inference: Generation of the output
    generated_ids = model.generate(**inputs, max_new_tokens=128)
    generated_ids_trimmed = [
        out_ids[len(in_ids):] for in_ids, out_ids in zip(inputs.input_ids, generated_ids)
    ]
    output_text = processor.batch_decode(
        generated_ids_trimmed, skip_special_tokens=True, clean_up_tokenization_spaces=False
    )
    print(output_text)

    gc.collect()
    torch.cuda.empty_cache()

    # 记录执行时间
    total_time += time.time() - start_time

# 计算并打印平均时间
average_time = total_time / num_runs
print(f"Average execution time over {num_runs} runs: {average_time:.2f} seconds")
显存占用19G,如下图所示:

测试结果:
Average execution time over 20 runs: 4.16 seconds
测试3
测试条件:
- 用上flash_attention_2;
- min_pixels = 256 * 28 * 28
- max_pixels = 1280 * 28 * 28
测试代码:
python展开代码
import time

import torch
from transformers import Qwen2VLForConditionalGeneration, AutoTokenizer, AutoProcessor
from qwen_vl_utils import process_vision_info
import gc

# default: Load the model on the available device(s)
# model = Qwen2VLForConditionalGeneration.from_pretrained(
#     "/Qwen2-VL-7B-Instruct", torch_dtype="auto", device_map="auto"
# )

# We recommend enabling flash_attention_2 for better acceleration and memory saving, especially in multi-image and video scenarios.
model = Qwen2VLForConditionalGeneration.from_pretrained(
    "/Qwen2-VL-7B-Instruct",
    torch_dtype=torch.bfloat16,
    attn_implementation="flash_attention_2",
    device_map="auto",
)

# default processer
# processor = AutoProcessor.from_pretrained("Qwen/Qwen2-VL-7B-Instruct")

# The default range for the number of visual tokens per image in the model is 4-16384.
# You can set min_pixels and max_pixels according to your needs, such as a token range of 256-1280, to balance performance and cost.
min_pixels = 256 * 28 * 28
max_pixels = 1280 * 28 * 28
processor = AutoProcessor.from_pretrained("/Qwen2-VL-7B-Instruct", min_pixels=min_pixels, max_pixels=max_pixels)

messages = [
    {
        "role": "user",
        "content": [
            {
                "type": "image",
                "image": "/Qwen2-VL-7B-Instruct/demo.jpeg",
            },
            {"type": "text", "text": "Describe this image."},
        ],
    }
]

# 定义执行次数
num_runs = 20

# 记录总时间
total_time = 0

for _ in range(num_runs):
    start_time = time.time()

    # Preparation for inference
    text = processor.apply_chat_template(
        messages, tokenize=False, add_generation_prompt=True
    )
    image_inputs, video_inputs = process_vision_info(messages)
    inputs = processor(
        text=[text],
        images=image_inputs,
        videos=video_inputs,
        padding=True,
        return_tensors="pt",
    )
    inputs = inputs.to("cuda")

    # Inference: Generation of the output
    generated_ids = model.generate(**inputs, max_new_tokens=128)
    generated_ids_trimmed = [
        out_ids[len(in_ids):] for in_ids, out_ids in zip(inputs.input_ids, generated_ids)
    ]
    output_text = processor.batch_decode(
        generated_ids_trimmed, skip_special_tokens=True, clean_up_tokenization_spaces=False
    )
    print(output_text)

    gc.collect()
    torch.cuda.empty_cache()

    # 记录执行时间
    total_time += time.time() - start_time

# 计算并打印平均时间
average_time = total_time / num_runs
print(f"Average execution time over {num_runs} runs: {average_time:.2f} seconds")
显存占用18.5G,如下图所示,只是略微低了一点。

测试结果:
Average execution time over 20 runs: 4.42 seconds
测试总结
| 测试编号 | 使用flash_attention_2 | min_pixels | max_pixels | 显存占用 (MiB) | 平均执行时间 (秒) |
|---|---|---|---|---|---|
| 测试1 | 否 | 256 * 28 * 28 | 2560 * 28 * 28 | 24135 | 5.22 |
| 测试2 | 否 | 256 * 28 * 28 | 1280 * 28 * 28 | 18983 | 4.16 |
| 测试3 | 是 | 256 * 28 * 28 | 1280 * 28 * 28 | 18673 | 4.42 |
max_pixels会影响占用的显存大小。
使用flash_attention_2可以略微减少显存,会消耗多一点时间。
72B-int4 transformers 的测试
要用这个镜像:
bash展开代码docker run --gpus device=1 -it --shm-size 16G --rm -v /root/xiedong/Qwen2-VL-72B-Instruct-GPTQ-Int4:/Qwen2-VL-72B-Instruct-GPTQ-Int4 --net host kevinchina/deeplearning:llamafactory20241009 bash
pip install flash-attn --no-build-isolation # 要装1小时,我不装了
测试1
- 不要flash_attention_2
- min_pixels = 256 * 28 * 28
- max_pixels = 1280 * 28 * 28
测试代码:
python展开代码import time

import torch
from transformers import Qwen2VLForConditionalGeneration, AutoTokenizer, AutoProcessor
from qwen_vl_utils import process_vision_info
import gc

# default: Load the model on the available device(s)
model = Qwen2VLForConditionalGeneration.from_pretrained(
    "/Qwen2-VL-72B-Instruct-GPTQ-Int4", torch_dtype="auto", device_map="auto"
)

# We recommend enabling flash_attention_2 for better acceleration and memory saving, especially in multi-image and video scenarios.
# model = Qwen2VLForConditionalGeneration.from_pretrained(
#     "/Qwen2-VL-72B-Instruct-GPTQ-Int4",
#     torch_dtype=torch.bfloat16,
#     attn_implementation="flash_attention_2",
#     device_map="auto",
# )

# default processer
# processor = AutoProcessor.from_pretrained("Qwen/Qwen2-VL-72B-Instruct-GPTQ-Int4")

# The default range for the number of visual tokens per image in the model is 4-16384.
# You can set min_pixels and max_pixels according to your needs, such as a token range of 256-1280, to balance performance and cost.
min_pixels = 256 * 28 * 28
max_pixels = 1280 * 28 * 28
processor = AutoProcessor.from_pretrained("/Qwen2-VL-72B-Instruct-GPTQ-Int4", min_pixels=min_pixels, max_pixels=max_pixels)

messages = [
    {
        "role": "user",
        "content": [
            {
                "type": "image",
                "image": "/Qwen2-VL-72B-Instruct-GPTQ-Int4/demo.jpeg",
            },
            {"type": "text", "text": "Describe this image."},
        ],
    }
]

# 定义执行次数
num_runs = 20

# 记录总时间
total_time = 0

for _ in range(num_runs):
    start_time = time.time()

    # Preparation for inference
    text = processor.apply_chat_template(
        messages, tokenize=False, add_generation_prompt=True
    )
    image_inputs, video_inputs = process_vision_info(messages)
    inputs = processor(
        text=[text],
        images=image_inputs,
        videos=video_inputs,
        padding=True,
        return_tensors="pt",
    )
    inputs = inputs.to("cuda")

    # Inference: Generation of the output
    generated_ids = model.generate(**inputs, max_new_tokens=128)
    generated_ids_trimmed = [
        out_ids[len(in_ids):] for in_ids, out_ids in zip(inputs.input_ids, generated_ids)
    ]
    output_text = processor.batch_decode(
        generated_ids_trimmed, skip_special_tokens=True, clean_up_tokenization_spaces=False
    )
    print(output_text)

    gc.collect()
    torch.cuda.empty_cache()

    # 记录执行时间
    total_time += time.time() - start_time

# 计算并打印平均时间
average_time = total_time / num_runs
print(f"Average execution time over {num_runs} runs: {average_time:.2f} seconds")
显存占用,44787MiB,如下图:

测试结果:
Average execution time over 20 runs: 13.30 seconds
测试2
不要flash_attention_2
min_pixels = 4 * 28 * 28 max_pixels = 768 * 28 * 28
测试代码:
python展开代码import time

import torch
from transformers import Qwen2VLForConditionalGeneration, AutoTokenizer, AutoProcessor
from qwen_vl_utils import process_vision_info
import gc

# default: Load the model on the available device(s)
model = Qwen2VLForConditionalGeneration.from_pretrained(
    "/Qwen2-VL-72B-Instruct-GPTQ-Int4", torch_dtype="auto", device_map="auto"
)

# We recommend enabling flash_attention_2 for better acceleration and memory saving, especially in multi-image and video scenarios.
# model = Qwen2VLForConditionalGeneration.from_pretrained(
#     "/Qwen2-VL-72B-Instruct-GPTQ-Int4",
#     torch_dtype=torch.bfloat16,
#     attn_implementation="flash_attention_2",
#     device_map="auto",
# )

# default processer
# processor = AutoProcessor.from_pretrained("Qwen/Qwen2-VL-72B-Instruct-GPTQ-Int4")

# The default range for the number of visual tokens per image in the model is 4-16384.
# You can set min_pixels and max_pixels according to your needs, such as a token range of 256-1280, to balance performance and cost.
min_pixels = 4 * 28 * 28
max_pixels = 768 * 28 * 28
processor = AutoProcessor.from_pretrained("/Qwen2-VL-72B-Instruct-GPTQ-Int4", min_pixels=min_pixels, max_pixels=max_pixels)

messages = [
    {
        "role": "user",
        "content": [
            {
                "type": "image",
                "image": "/Qwen2-VL-72B-Instruct-GPTQ-Int4/demo.jpeg",
            },
            {"type": "text", "text": "Describe this image."},
        ],
    }
]

# 定义执行次数
num_runs = 20

# 记录总时间
total_time = 0

for _ in range(num_runs):
    start_time = time.time()

    # Preparation for inference
    text = processor.apply_chat_template(
        messages, tokenize=False, add_generation_prompt=True
    )
    image_inputs, video_inputs = process_vision_info(messages)
    inputs = processor(
        text=[text],
        images=image_inputs,
        videos=video_inputs,
        padding=True,
        return_tensors="pt",
    )
    inputs = inputs.to("cuda")

    # Inference: Generation of the output
    generated_ids = model.generate(**inputs, max_new_tokens=128)
    generated_ids_trimmed = [
        out_ids[len(in_ids):] for in_ids, out_ids in zip(inputs.input_ids, generated_ids)
    ]
    output_text = processor.batch_decode(
        generated_ids_trimmed, skip_special_tokens=True, clean_up_tokenization_spaces=False
    )
    print(output_text)

    gc.collect()
    torch.cuda.empty_cache()

    # 记录执行时间
    total_time += time.time() - start_time

# 计算并打印平均时间
average_time = total_time / num_runs
print(f"Average execution time over {num_runs} runs: {average_time:.2f} seconds")
显存占用,43793MiB,如下图:

测试结果:
Average execution time over 20 runs: 10.09 seconds
测试3
不要flash_attention_2
min_pixels = 256 * 28 * 28 max_pixels = 768 * 28 * 28
测试代码:
python展开代码import time

import torch
from transformers import Qwen2VLForConditionalGeneration, AutoTokenizer, AutoProcessor
from qwen_vl_utils import process_vision_info
import gc

# default: Load the model on the available device(s)
model = Qwen2VLForConditionalGeneration.from_pretrained(
    "/Qwen2-VL-72B-Instruct-GPTQ-Int4", torch_dtype="auto", device_map="auto"
)

# We recommend enabling flash_attention_2 for better acceleration and memory saving, especially in multi-image and video scenarios.
# model = Qwen2VLForConditionalGeneration.from_pretrained(
#     "/Qwen2-VL-72B-Instruct-GPTQ-Int4",
#     torch_dtype=torch.bfloat16,
#     attn_implementation="flash_attention_2",
#     device_map="auto",
# )

# default processer
# processor = AutoProcessor.from_pretrained("Qwen/Qwen2-VL-72B-Instruct-GPTQ-Int4")

# The default range for the number of visual tokens per image in the model is 4-16384.
# You can set min_pixels and max_pixels according to your needs, such as a token range of 256-1280, to balance performance and cost.
min_pixels = 256 * 28 * 28
max_pixels = 768 * 28 * 28
processor = AutoProcessor.from_pretrained("/Qwen2-VL-72B-Instruct-GPTQ-Int4", min_pixels=min_pixels, max_pixels=max_pixels)

messages = [
    {
        "role": "user",
        "content": [
            {
                "type": "image",
                "image": "/Qwen2-VL-72B-Instruct-GPTQ-Int4/demo.jpeg",
            },
            {"type": "text", "text": "Describe this image."},
        ],
    }
]

# 定义执行次数
num_runs = 20

# 记录总时间
total_time = 0

for _ in range(num_runs):
    start_time = time.time()

    # Preparation for inference
    text = processor.apply_chat_template(
        messages, tokenize=False, add_generation_prompt=True
    )
    image_inputs, video_inputs = process_vision_info(messages)
    inputs = processor(
        text=[text],
        images=image_inputs,
        videos=video_inputs,
        padding=True,
        return_tensors="pt",
    )
    inputs = inputs.to("cuda")

    # Inference: Generation of the output
    generated_ids = model.generate(**inputs, max_new_tokens=128)
    generated_ids_trimmed = [
        out_ids[len(in_ids):] for in_ids, out_ids in zip(inputs.input_ids, generated_ids)
    ]
    output_text = processor.batch_decode(
        generated_ids_trimmed, skip_special_tokens=True, clean_up_tokenization_spaces=False
    )
    print(output_text)

    gc.collect()
    torch.cuda.empty_cache()

    # 记录执行时间
    total_time += time.time() - start_time

# 计算并打印平均时间
average_time = total_time / num_runs
print(f"Average execution time over {num_runs} runs: {average_time:.2f} seconds")
显存占用,43793MiB,如下图:

测试结果:
Average execution time over 20 runs: 10.13 seconds
测试总结
| 测试编号 | 使用flash_attention_2 | min_pixels | max_pixels | 显存占用 (MiB) | 平均执行时间 (秒) |
|---|---|---|---|---|---|
| 测试1 | 否 | 256 * 28 * 28 | 1280 * 28 * 28 | 44787 | 13.30 |
| 测试2 | 否 | 4 * 28 * 28 | 768 * 28 * 28 | 43793 | 10.09 |
| 测试3 | 否 | 256 * 28 * 28 | 768 * 28 * 28 | 43793 | 10.13 |
72B transformers 的测试
要用这个镜像:
bash展开代码docker run --gpus all -it --shm-size 16G --rm -v /root/xiedong/Qwen2-VL-72B-Instruct:/Qwen2-VL-72B-Instruct --net host kevinchina/deeplearning:llamafactory20241009 bash
测试1
不要flash_attention_2
min_pixels = 256 * 28 * 28
max_pixels = 768 * 28 * 28
Average execution time over 20 runs: 13.17 seconds
72B-int4 transformers - 图片大小影响测试
要用这个镜像:
bash展开代码docker run --gpus device=1 -it --shm-size 16G --rm -v /root/xiedong/Qwen2-VL-72B-Instruct-GPTQ-Int4:/Qwen2-VL-72B-Instruct-GPTQ-Int4 --net host kevinchina/deeplearning:llamafactory20241009 bash
按最短边符合,比例缩减:
Saved resized image with shortest side 256 as /Qwen2-VL-72B-Instruct-GPTQ-Int4/demo256.jpeg Saved resized image with shortest side 512 as /Qwen2-VL-72B-Instruct-GPTQ-Int4/demo512.jpeg Saved resized image with shortest side 768 as /Qwen2-VL-72B-Instruct-GPTQ-Int4/demo768.jpeg Saved resized image with shortest side 1024 as /Qwen2-VL-72B-Instruct-GPTQ-Int4/demo1024.jpeg Saved resized image with shortest side 1280 as /Qwen2-VL-72B-Instruct-GPTQ-Int4/demo1280.jpeg Saved resized image with shortest side 2560 as /Qwen2-VL-72B-Instruct-GPTQ-Int4/demo2560.jpeg
测试条件:
不用flash_attention_2;
min_pixels = 4 * 28 * 28
max_pixels = 1024 * 28 * 28
测试代码:
python展开代码
import time
import torch
from transformers import Qwen2VLForConditionalGeneration, AutoProcessor
from qwen_vl_utils import process_vision_info
import gc
from PIL import Image
import os

# 模型和处理器的路径
model_path = "/Qwen2-VL-72B-Instruct-GPTQ-Int4"
# 图片的保存路径
image_folder = "/Qwen2-VL-72B-Instruct-GPTQ-Int4"

# 加载模型
model = Qwen2VLForConditionalGeneration.from_pretrained(
    model_path, torch_dtype="auto", device_map="auto"
)


# The default range for the number of visual tokens per image in the model is 4-16384.
# You can set min_pixels and max_pixels according to your needs, such as a token range of 256-1280, to balance performance and cost.
min_pixels = 4 * 28 * 28
max_pixels = 5000 * 28 * 28
processor = AutoProcessor.from_pretrained(model_path, min_pixels=min_pixels, max_pixels=max_pixels)

# 定义图片文件名列表
image_sizes = [256, 512, 768, 1024, 1280, 2560]
image_files = [f"demo{size}.jpeg" for size in image_sizes]

# 执行测试
for img_file in image_files:
    img_path = os.path.join(image_folder, img_file)

    # 定义消息
    messages = [
        {
            "role": "user",
            "content": [
                {
                    "type": "image",
                    "image": img_path,
                },
                {"type": "text", "text": "Describe this image."},
            ],
        }
    ]

    # 打开图片
    image = Image.open(img_path)
    print(f"\nRunning test for image: {img_file} with size {image.size}")

    # 定义执行次数
    num_runs = 10
    total_time = 0

    for _ in range(num_runs):
        start_time = time.time()

        # 准备推理输入
        text = processor.apply_chat_template(
            messages, tokenize=False, add_generation_prompt=True
        )
        image_inputs, video_inputs = process_vision_info(messages)
        inputs = processor(
            text=[text],
            images=image_inputs,
            videos=video_inputs,
            padding=True,
            return_tensors="pt",
        )
        inputs = inputs.to("cuda")

        # 推理并生成输出
        generated_ids = model.generate(**inputs, max_new_tokens=128)
        generated_ids_trimmed = [
            out_ids[len(in_ids):] for in_ids, out_ids in zip(inputs.input_ids, generated_ids)
        ]
        output_text = processor.batch_decode(
            generated_ids_trimmed, skip_special_tokens=True, clean_up_tokenization_spaces=False
        )
        # print(output_text)

        # 清理缓存
        gc.collect()
        torch.cuda.empty_cache()

        # 记录执行时间
        total_time += time.time() - start_time

    # 计算并打印平均时间
    average_time = total_time / num_runs
    print(f"Average execution time over {num_runs} runs for {img_file}: {average_time:.2f} seconds")
测试结果:
- Running test for image: demo256.jpeg with size (384, 256)
- Average execution time over 10 runs for demo256.jpeg: 13.76 seconds
- 显存占用 42591 MiB
- Running test for image: demo512.jpeg with size (768, 512)
- Average execution time over 10 runs for demo512.jpeg: 13.81 seconds
- 显存占用 43495 MiB
- Running test for image: demo768.jpeg with size (1152, 768)
- Average execution time over 10 runs for demo768.jpeg: 14.98 seconds
- 显存占用 45027 MiB
- Running test for image: demo1024.jpeg with size (1536, 1024)
- Average execution time over 10 runs for demo1024.jpeg: 17.50 seconds
- 显存占用 46949 MiB
- Running test for image: demo1280.jpeg with size (1920, 1280)
- Average execution time over 10 runs for demo1280.jpeg: 17.74 seconds
- 显存占用 53317 MiB
- Running test for image: demo2560.jpeg with size (3840, 2560)
- Average execution time over 10 runs for demo2560.jpeg: 22.04 seconds
- 显存占用 68103 MiB
各种大小的图片输入后,显存占用会改变:


测试结果总结表格:
| 图片尺寸(像素) | 尺寸(宽x高) | 平均执行时间(秒) | 显存占用(MiB) |
|---|---|---|---|
| 256 | 384 x 256 | 13.76 | 42591 |
| 512 | 768 x 512 | 13.81 | 43495 |
| 768 | 1152 x 768 | 14.98 | 45027 |
| 1024 | 1536 x 1024 | 17.50 | 46949 |
| 1280 | 1920 x 1280 | 17.74 | 53317 |
| 2560 | 3840 x 2560 | 22.04 | 68103 |
总结:
- 随着图片尺寸的增加,平均执行时间从13.76秒逐步增加到22.04秒,推理耗时显著增加。
- 显存占用也随之增加,从256像素的42,591 MiB提升到2560像素时的68,103 MiB。
- 1280像素的测试结果缺少具体时间,但显存占用进一步上升。显存需求与图片大小成正比,对硬件资源提出更高要求。
72B transformers sdwebui自研
对一张图进行推理的代码
python展开代码import time
import torch
from transformers import Qwen2VLForConditionalGeneration, AutoProcessor
from qwen_vl_utils import process_vision_info
import gc
from PIL import Image
import os

# 模型和处理器的路径
model_path = "/Qwen2-VL-72B-Instruct"

# 加载模型
model = Qwen2VLForConditionalGeneration.from_pretrained(
    model_path, torch_dtype="auto", device_map="auto"
)

# The default range for the number of visual tokens per image in the model is 4-16384.
# You can set min_pixels and max_pixels according to your needs, such as a token range of 256-1280, to balance performance and cost.
min_pixels = 4 * 28 * 28
max_pixels = 5000 * 28 * 28
processor = AutoProcessor.from_pretrained(model_path, min_pixels=min_pixels, max_pixels=max_pixels)

img_file = 'http://101.136.19.26:8005/16.营业性演出许可证/005_yanchu-5.jpg'

promptx = """
描述这张图。

"""
# 定义消息
messages = [
    {
        "role": "user",
        "content": [
            {
                "type": "image",
                "image": img_file,
            },
            {"type": "text", "text": promptx},
        ],
    }
]

# 准备推理输入
text = processor.apply_chat_template(
    messages, tokenize=False, add_generation_prompt=True
)
image_inputs, video_inputs = process_vision_info(messages)
inputs = processor(
    text=[text],
    images=image_inputs,
    videos=video_inputs,
    padding=True,
    return_tensors="pt",
)
inputs = inputs.to("cuda")

# 推理并生成输出
generated_ids = model.generate(**inputs, max_new_tokens=128)
generated_ids_trimmed = [
    out_ids[len(in_ids):] for in_ids, out_ids in zip(inputs.input_ids, generated_ids)
]
output_text = processor.batch_decode(
    generated_ids_trimmed, skip_special_tokens=True, clean_up_tokenization_spaces=False
)
print(output_text)

# 清理缓存
gc.collect()
torch.cuda.empty_cache()
sdwebui+api代码
启动镜像
要用这个镜像,不限制最大输入:max_pixels = 5000 * 28 * 28
bash展开代码docker run --gpus all -it --shm-size 16G --rm -v /root/xiedong/Qwen2-VL-72B-Instruct:/Qwen2-VL-72B-Instruct --net host kevinchina/deeplearning:llamafactory20241009 bash
启动服务
这个代码:
python展开代码import requests
import torch
from transformers import Qwen2VLForConditionalGeneration, AutoProcessor
from qwen_vl_utils import process_vision_info
import gc
from PIL import Image
import os
import gradio as gr
import os
import tempfile
import gradio as gr
import uvicorn
from fastapi import FastAPI
from pydantic import BaseModel
import json
from starlette.responses import JSONResponse

app = FastAPI()

# 模型和处理器的路径
model_path = "/Qwen2-VL-72B-Instruct"

# 加载模型
model = Qwen2VLForConditionalGeneration.from_pretrained(
    model_path, torch_dtype="auto", device_map="balanced"
)

# The default range for the number of visual tokens per image in the model is 4-16384.
# You can set min_pixels and max_pixels according to your needs, such as a token range of 256-1280, to balance performance and cost.
min_pixels = 4 * 28 * 28
max_pixels = 5000 * 28 * 28
processor = AutoProcessor.from_pretrained(model_path, min_pixels=min_pixels, max_pixels=max_pixels)


class MessagesRequest(BaseModel):
    messages: str  # messages 的 JSON 字符串


@app.post("/api/chat")
def chat_endpoint(request: MessagesRequest):
    try:
        messages = json.loads(request.messages)
        # 准备推理输入
        text = processor.apply_chat_template(
            messages, tokenize=False, add_generation_prompt=True
        )
        image_inputs, video_inputs = process_vision_info(messages)
        inputs = processor(
            text=[text],
            images=image_inputs,
            videos=video_inputs,
            padding=True,
            return_tensors="pt",
        )
        inputs = inputs.to("cuda")

        # 推理并生成输出
        generated_ids = model.generate(**inputs, max_new_tokens=1280)
        generated_ids_trimmed = [
            out_ids[len(in_ids):] for in_ids, out_ids in zip(inputs.input_ids, generated_ids)
        ]
        output_text = processor.batch_decode(
            generated_ids_trimmed, skip_special_tokens=True, clean_up_tokenization_spaces=False
        )
        # print(output_text)

        # 清理缓存
        gc.collect()
        torch.cuda.empty_cache()

        return JSONResponse(content={"response": output_text})
    except Exception as e:
        return JSONResponse(content={"error": str(e)}, status_code=500)


def process_input(image, promptx):
    # 如果传入的是字符串(假设是 URL),则尝试下载图片
    if isinstance(image, str):
        try:
            # 从 URL 下载图片
            response = requests.get(image, timeout=20, verify=False)
            response.raise_for_status()
            # 将下载的内容转换为图片
            with tempfile.NamedTemporaryFile(suffix=".jpg", delete=False) as tmp:
                tmp.write(response.content)
                tmp_image_path = tmp.name
            image = Image.open(tmp_image_path)
        except Exception as e:
            return f"下载图片失败:{e}"
    # 否则假设输入的是一个上传的图片文件
    else:
        with tempfile.NamedTemporaryFile(suffix=".jpg", delete=False) as tmp:
            image.save(tmp.name)
            tmp_image_path = tmp.name

    # 构建符合您要求的 messages
    messages = [
        {
            "role": "user",
            "content": [
                {
                    "type": "image",
                    "image": tmp_image_path,
                },
                {"type": "text", "text": promptx},
            ],
        }
    ]

    # 调用 OpenAI API
    try:

        # 准备推理输入
        text = processor.apply_chat_template(
            messages, tokenize=False, add_generation_prompt=True
        )
        image_inputs, video_inputs = process_vision_info(messages)
        inputs = processor(
            text=[text],
            images=image_inputs,
            videos=video_inputs,
            padding=True,
            return_tensors="pt",
        )
        inputs = inputs.to("cuda")

        # 推理并生成输出
        generated_ids = model.generate(**inputs, max_new_tokens=1280)
        generated_ids_trimmed = [
            out_ids[len(in_ids):] for in_ids, out_ids in zip(inputs.input_ids, generated_ids)
        ]
        output_text = processor.batch_decode(
            generated_ids_trimmed, skip_special_tokens=True, clean_up_tokenization_spaces=False
        )
        # print(output_text)

        # 清理缓存
        gc.collect()
        torch.cuda.empty_cache()
    except Exception as e:
        output_text = f"错误: {e}"

    # 删除临时图片文件
    os.remove(tmp_image_path)

    return output_text


def create_gradio():
    with gr.Blocks() as demo:
        gr.Markdown("# 图片和提示词输入")

        with gr.Tabs():
            with gr.Tab("上传图片"):
                with gr.Row():
                    image_input = gr.Image(label="上传图片", type='pil')
                    text_input = gr.Textbox(label="输入提示词")
                submit_button = gr.Button("提交")
                output_text = gr.Textbox(label="模型输出")
                submit_button.click(process_input, inputs=[image_input, text_input], outputs=output_text)

            with gr.Tab("图片 URL"):
                with gr.Row():
                    url_input = gr.Textbox(label="输入图片 URL")
                    text_input_url = gr.Textbox(label="输入提示词")
                submit_button_url = gr.Button("提交")
                output_text_url = gr.Textbox(label="模型输出")
                submit_button_url.click(process_input, inputs=[url_input, text_input_url],
                                        outputs=output_text_url)

    return demo


# 挂载 Gradio 应用
app = gr.mount_gradio_app(app, create_gradio(), path="/gradio")

if __name__ == "__main__":
    uvicorn.run(app, host="0.0.0.0", port=10002)
大显存才行:
sdwebui查看
http://101.136.22.140:10002/gradio/
requests api访问代码
bash展开代码import requests
import json

# 定义接口的URL
url = "http://101.136.22.140:10002/api/chat"  # 假设你的FastAPI服务器运行在本地的8000端口

# 准备请求数据
tmp_image_path = 'http://101.136.19.26:8005/16.营业性演出许可证/005_yanchu-5.jpg'
promptx = "描述图片。"  # 替换为你的提示文本

messages = [
    {
        "role": "user",
        "content": [
            {
                "type": "image",
                "image": tmp_image_path,
            },
            {"type": "text", "text": promptx},
        ],
    }
]

# 将消息转换为JSON字符串
messages_json_str = json.dumps(messages)

# 准备请求数据
payload = {
    "messages": messages_json_str
}

# 发送POST请求
response = requests.post(url, json=payload)

# 处理响应
if response.status_code == 200:
    print("Response:", response.json()["response"])
else:
    print("Error:", response.json()["error"])
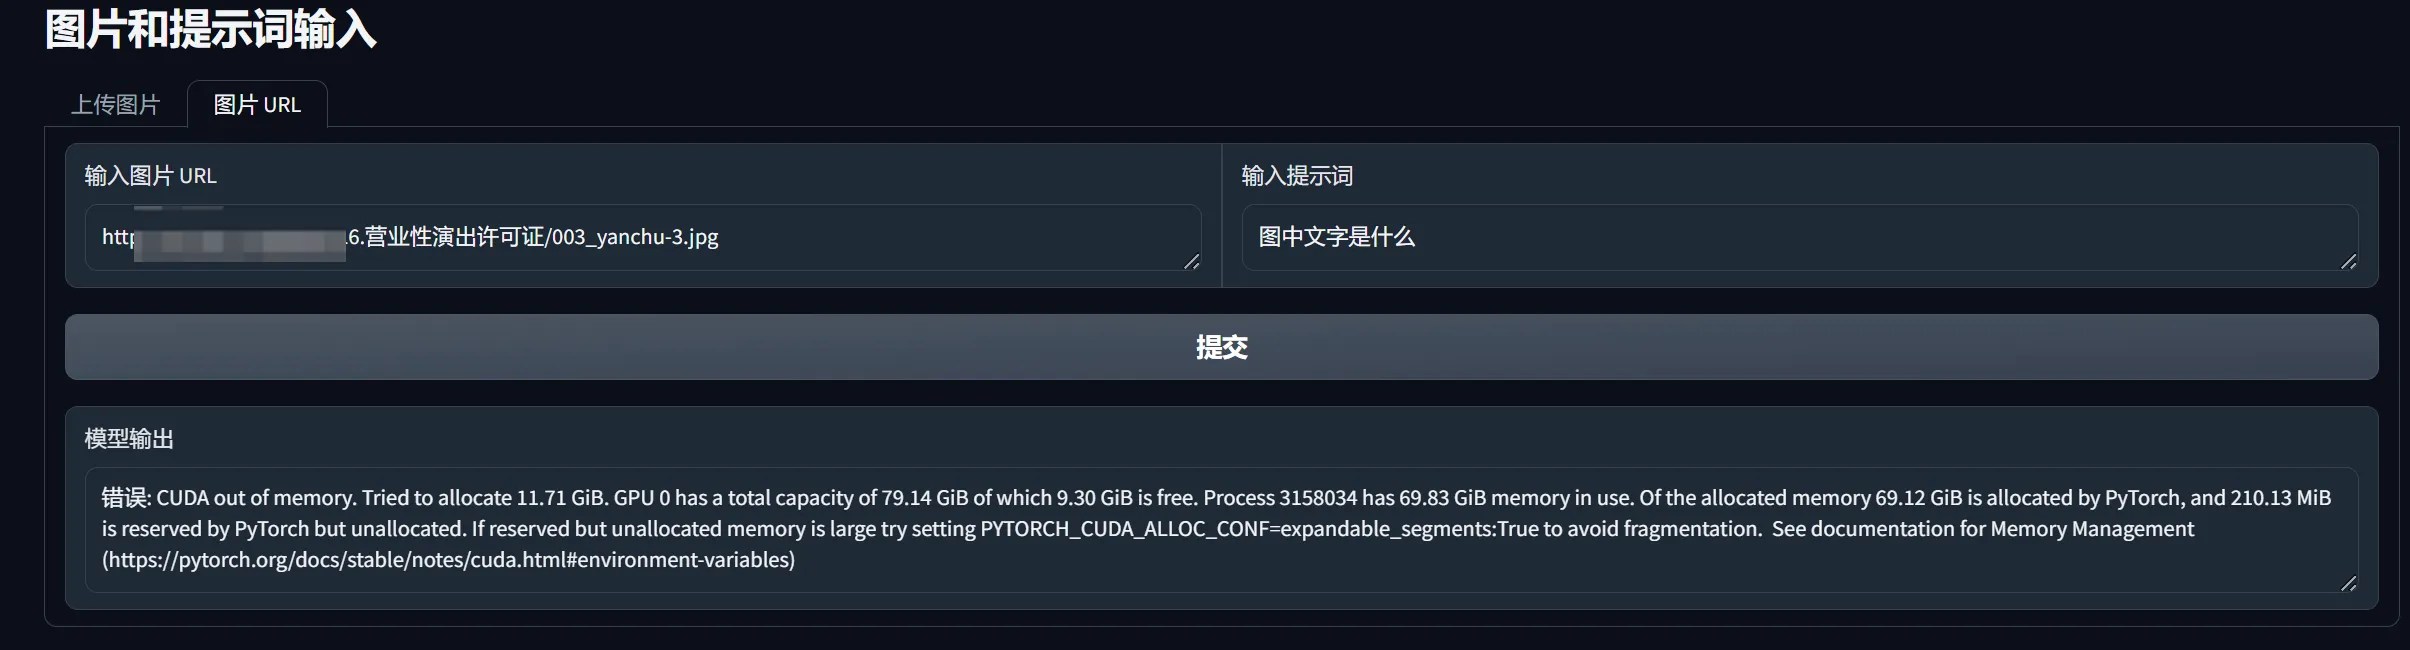
显存吃太多了:
72B transformers int4 sdwebui自研
sdwebui+api代码
启动镜像
要用这个镜像,不限制最大输入:max_pixels = 5000 * 28 * 28
bash展开代码docker run --gpus all -it --shm-size 16G --rm -v /root/xiedong/Qwen2-VL-72B-Instruct-GPTQ-Int4:/Qwen2-VL-72B-Instruct-GPTQ-Int4 --net host kevinchina/deeplearning:llamafactory20241009 bash
启动服务
启动这个代码:
python展开代码import requests
import torch
from transformers import Qwen2VLForConditionalGeneration, AutoProcessor
from qwen_vl_utils import process_vision_info
import gc
from PIL import Image
import os
import gradio as gr
import os
import tempfile
import gradio as gr
import uvicorn
from fastapi import FastAPI
from pydantic import BaseModel
import json
from starlette.responses import JSONResponse

app = FastAPI()

# 模型和处理器的路径
model_path = "/Qwen2-VL-72B-Instruct"

# 加载模型
model = Qwen2VLForConditionalGeneration.from_pretrained(
    model_path, torch_dtype="auto", device_map="balanced"
)

# The default range for the number of visual tokens per image in the model is 4-16384.
# You can set min_pixels and max_pixels according to your needs, such as a token range of 256-1280, to balance performance and cost.
min_pixels = 4 * 28 * 28
max_pixels = 5000 * 28 * 28
processor = AutoProcessor.from_pretrained(model_path, min_pixels=min_pixels, max_pixels=max_pixels)


class MessagesRequest(BaseModel):
    messages: str  # messages 的 JSON 字符串


@app.post("/api/chat")
def chat_endpoint(request: MessagesRequest):
    try:
        messages = json.loads(request.messages)
        # 准备推理输入
        text = processor.apply_chat_template(
            messages, tokenize=False, add_generation_prompt=True
        )
        image_inputs, video_inputs = process_vision_info(messages)
        inputs = processor(
            text=[text],
            images=image_inputs,
            videos=video_inputs,
            padding=True,
            return_tensors="pt",
        )
        inputs = inputs.to("cuda")

        # 推理并生成输出
        generated_ids = model.generate(**inputs, max_new_tokens=1280)
        generated_ids_trimmed = [
            out_ids[len(in_ids):] for in_ids, out_ids in zip(inputs.input_ids, generated_ids)
        ]
        output_text = processor.batch_decode(
            generated_ids_trimmed, skip_special_tokens=True, clean_up_tokenization_spaces=False
        )
        # print(output_text)

        # 清理缓存
        gc.collect()
        torch.cuda.empty_cache()

        return JSONResponse(content={"response": output_text})
    except Exception as e:
        return JSONResponse(content={"error": str(e)}, status_code=500)


def process_input(image, promptx):
    # 如果传入的是字符串(假设是 URL),则尝试下载图片
    if isinstance(image, str):
        try:
            # 从 URL 下载图片
            response = requests.get(image, timeout=20, verify=False)
            response.raise_for_status()
            # 将下载的内容转换为图片
            with tempfile.NamedTemporaryFile(suffix=".jpg", delete=False) as tmp:
                tmp.write(response.content)
                tmp_image_path = tmp.name
            image = Image.open(tmp_image_path)
        except Exception as e:
            return f"下载图片失败:{e}"
    # 否则假设输入的是一个上传的图片文件
    else:
        with tempfile.NamedTemporaryFile(suffix=".jpg", delete=False) as tmp:
            image.save(tmp.name)
            tmp_image_path = tmp.name

    # 构建符合您要求的 messages
    messages = [
        {
            "role": "user",
            "content": [
                {
                    "type": "image",
                    "image": tmp_image_path,
                },
                {"type": "text", "text": promptx},
            ],
        }
    ]

    # 调用 OpenAI API
    try:

        # 准备推理输入
        text = processor.apply_chat_template(
            messages, tokenize=False, add_generation_prompt=True
        )
        image_inputs, video_inputs = process_vision_info(messages)
        inputs = processor(
            text=[text],
            images=image_inputs,
            videos=video_inputs,
            padding=True,
            return_tensors="pt",
        )
        inputs = inputs.to("cuda")

        # 推理并生成输出
        generated_ids = model.generate(**inputs, max_new_tokens=1280)
        generated_ids_trimmed = [
            out_ids[len(in_ids):] for in_ids, out_ids in zip(inputs.input_ids, generated_ids)
        ]
        output_text = processor.batch_decode(
            generated_ids_trimmed, skip_special_tokens=True, clean_up_tokenization_spaces=False
        )
        # print(output_text)

        # 清理缓存
        gc.collect()
        torch.cuda.empty_cache()
    except Exception as e:
        output_text = f"错误: {e}"

    # 删除临时图片文件
    os.remove(tmp_image_path)

    return output_text


def create_gradio():
    with gr.Blocks() as demo:
        gr.Markdown("# 图片和提示词输入")

        with gr.Tabs():
            with gr.Tab("上传图片"):
                with gr.Row():
                    image_input = gr.Image(label="上传图片", type='pil')
                    text_input = gr.Textbox(label="输入提示词")
                submit_button = gr.Button("提交")
                output_text = gr.Textbox(label="模型输出")
                submit_button.click(process_input, inputs=[image_input, text_input], outputs=output_text)

            with gr.Tab("图片 URL"):
                with gr.Row():
                    url_input = gr.Textbox(label="输入图片 URL")
                    text_input_url = gr.Textbox(label="输入提示词")
                submit_button_url = gr.Button("提交")
                output_text_url = gr.Textbox(label="模型输出")
                submit_button_url.click(process_input, inputs=[url_input, text_input_url],
                                        outputs=output_text_url)

    return demo


# 挂载 Gradio 应用
app = gr.mount_gradio_app(app, create_gradio(), path="/gradio")

if __name__ == "__main__":
    uvicorn.run(app, host="0.0.0.0", port=10002)
大显存才行:
sdwebui查看
http://101.136.22.140:10002/gradio/
requests api访问代码
bash展开代码import requests
import json

# 定义接口的URL
url = "http://101.136.22.140:10002/api/chat"  # 假设你的FastAPI服务器运行在本地的8000端口

# 准备请求数据
tmp_image_path = 'http://101.136.19.26:8005/16.营业性演出许可证/005_yanchu-5.jpg'
promptx = "描述图片。"  # 替换为你的提示文本

messages = [
    {
        "role": "user",
        "content": [
            {
                "type": "image",
                "image": tmp_image_path,
            },
            {"type": "text", "text": promptx},
        ],
    }
]

# 将消息转换为JSON字符串
messages_json_str = json.dumps(messages)

# 准备请求数据
payload = {
    "messages": messages_json_str
}

# 发送POST请求
response = requests.post(url, json=payload)

# 处理响应
if response.status_code == 200:
    print("Response:", response.json()["response"])
else:
    print("Error:", response.json()["error"])


本文作者:Dong
本文链接:
版权声明:本博客所有文章除特别声明外,均采用 CC BY-NC。本作品采用《知识共享署名-非商业性使用 4.0 国际许可协议》进行许可。您可以在非商业用途下自由转载和修改,但必须注明出处并提供原作者链接。 许可协议。转载请注明出处!