目录
在本篇文章中,我们将介绍 FLUX.1 文生图技术,并进行实际操作演示。
什么是 FLUX.1?
FLUX.1 是 Black Forest Labs 推出的文生图模型,详细介绍请参考官方文章:Black Forest Labs 公告
模型对比
FLUX.1 提供了三个不同的版本,适用于不同的使用场景。如下图所示:
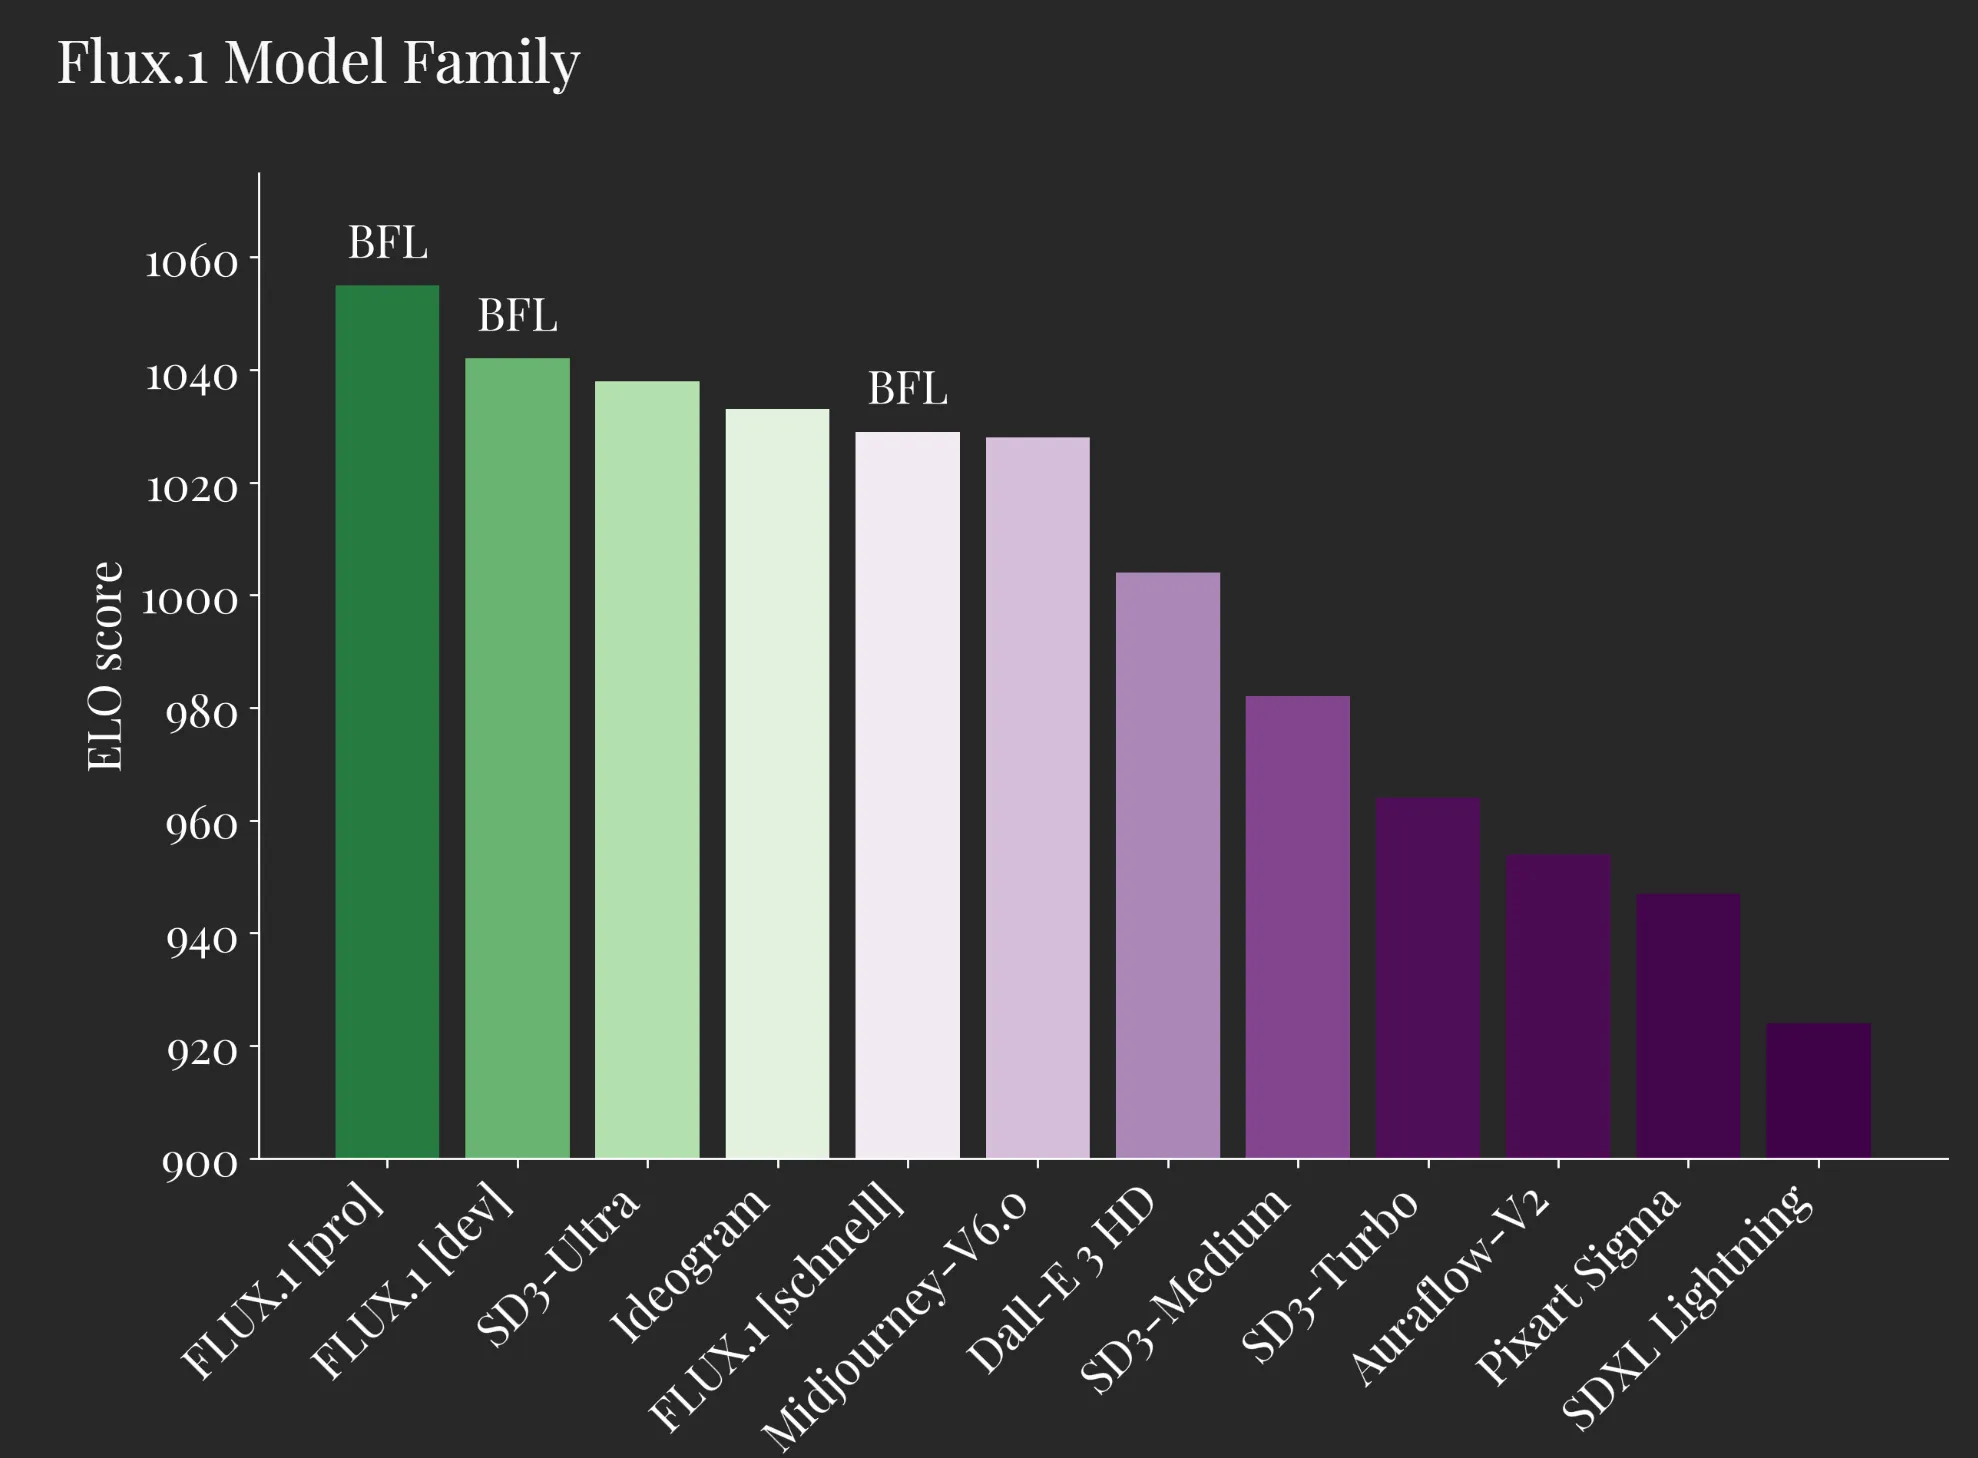
三个模型的区别:
-
FLUX.1 [pro]:FLUX.1 的高级版本,提供最顶尖的图像生成性能,具有极高的提示跟随能力、图像质量和输出多样性。您可以通过 API 申请 FLUX.1 [pro] 的访问权限,也可以通过 Replicate 和 fal.ai 平台获取。同时,我们提供定制化的企业解决方案,如有需求请联系 flux@blackforestlabs.ai。
-
FLUX.1 [dev]:这是一个为非商业用途而开发的开放版本,基于 FLUX.1 [pro] 蒸馏生成,保持了类似的质量和提示响应能力。FLUX.1 [dev] 的权重可以在 HuggingFace 获取,并可以通过 Replicate 或 Fal.ai 直接尝试使用。如需商业应用,请联系 flux@blackforestlabs.ai。
-
FLUX.1 [schnell]:该版本速度最快,适用于本地开发和个人使用,基于 Apache 2.0 许可证开源发布。与 FLUX.1 [dev] 类似,权重可以在 HuggingFace 上获取,推理代码可在 GitHub 和 HuggingFace 的 Diffusers 中找到。我们很高兴宣布其已与 ComfyUI 完成首日集成。
项目地址
FLUX.1 [dev] 的项目地址为:HuggingFace FLUX.1-dev
此外,您还可以参考 HuggingFace 的相关教程:HuggingFace Diffusers教程
直接体验的网址:https://huggingface.co/spaces/black-forest-labs/FLUX.1-dev
实战教程
接下来,我们将进行 FLUX.1 文生图的推理部署实战。请按照以下步骤操作:
- 创建 Python 虚拟环境
首先,使用 Conda 创建一个 Python 3.10 及以上版本的虚拟环境:
bash展开代码conda create -n py310bizhi python=3.10 -y
conda activate py310bizhi
- 安装 PyTorch 和相关依赖
bash展开代码conda install pytorch torchvision torchaudio pytorch-cuda=12.1 -c pytorch -c nvidia -y
pip install torchao --extra-index-url https://download.pytorch.org/whl/cu121
pip install git+https://github.com/xhinker/sd_embed.git@main
pip install git+https://github.com/huggingface/diffusers.git
pip install -U transformers accelerate sentencepiece peft
- 登录 HuggingFace 终端客户端
bash展开代码huggingface-cli login
输入指令并输入您的 Token 进行登录。
- 下载并使用模型
以下代码展示了如何下载并使用 FLUX.1 [dev] 模型:
python展开代码import torch
from diffusers import FluxPipeline

# 指定模型下载的目录为当前工作目录
pipe = FluxPipeline.from_pretrained(
    "black-forest-labs/FLUX.1-dev",
    torch_dtype=torch.bfloat16,
    cache_dir="./"  # 将模型下载到当前目录
)

pipe.enable_model_cpu_offload()  # 节省显存

prompt = "A cat holding a sign that says hello world"
image = pipe(
    prompt,
    height=1024,
    width=1024,
    guidance_scale=3.5,
    num_inference_steps=50,
    max_sequence_length=512,
    generator=torch.Generator("cpu").manual_seed(0)
).images[0]

image.save("flux-dev.png")
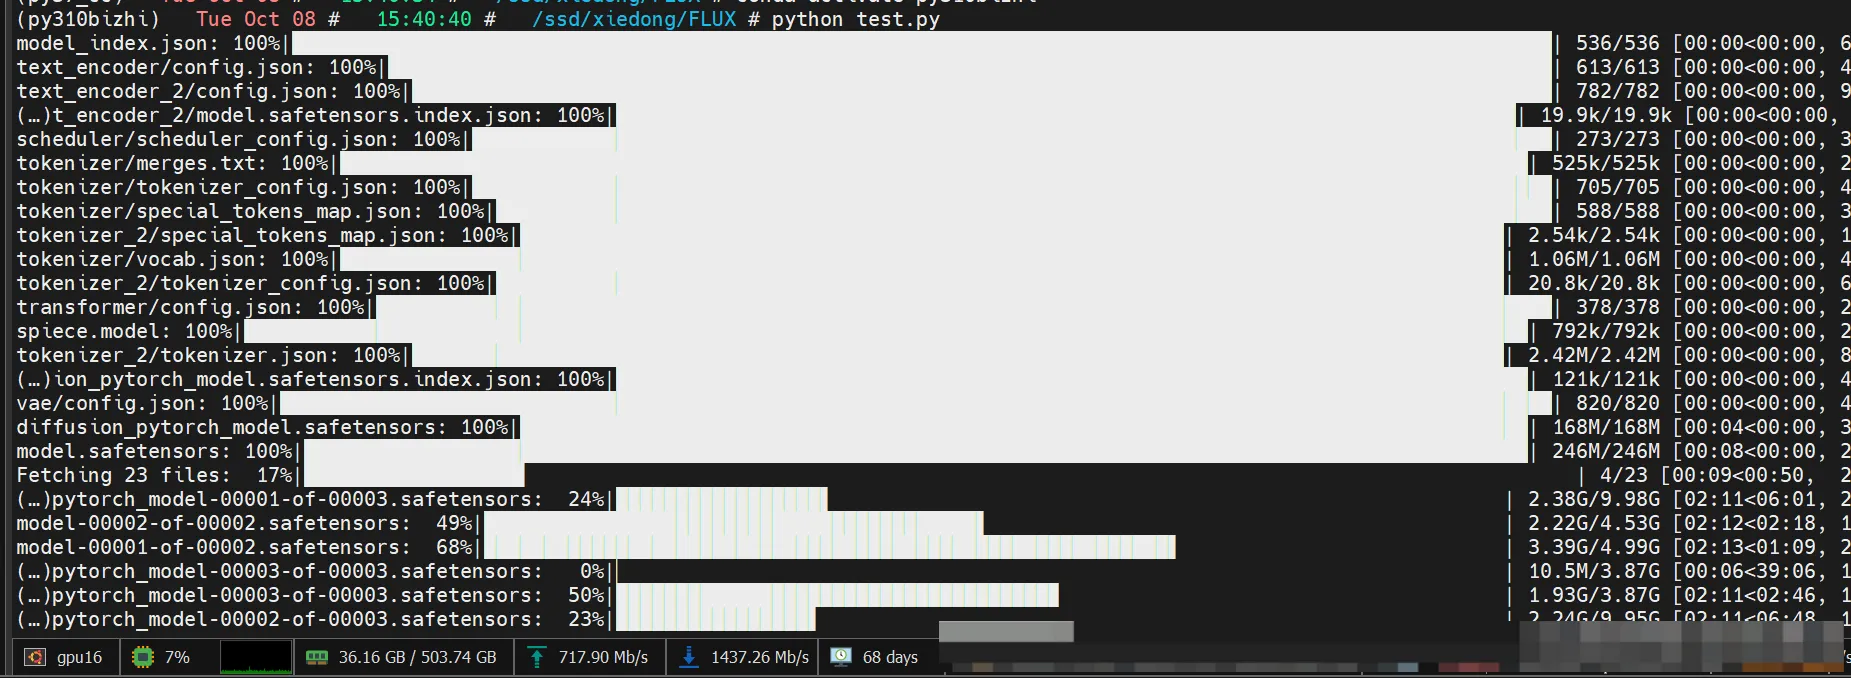
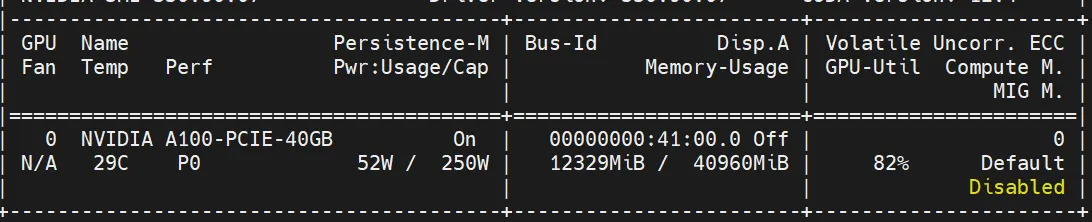
显存占用:

- 结果展示
在执行过程中,模型会自动从仓库下载。请注意,下载过程中可能需要科学上网工具,最终结果将生成一张名为 flux-dev.png 的图片。
这是我生成的图片:

量化
To use Flux.1 in a 24G VRAM GPU, we need to quantize the Transformer model and T5 text encoder model to qfloat8 using optimum-quanto. see Quanto: a PyTorch quantization backend for Optimum and Memory-efficient Diffusion Transformers with Quanto and Diffusers to convert Diffusion model weights to qfloat8 so that we can use Flux in a 24G VRAM with Diffusers.
量化后速度还是慢,但显存低:
这是代码:
python展开代码from diffusers import DiffusionPipeline, FluxTransformer2DModel
from torchao.quantization import quantize_, int8_weight_only
import torch
from sd_embed.embedding_funcs import get_weighted_text_embeddings_flux1

# model_path = "black-forest-labs/FLUX.1-schnell"
model_path = "/ssd/xiedong/FLUX/models--black-forest-labs--FLUX.1-dev/snapshots/0ef5fff789c832c5c7f4e127f94c8b54bbcced44"

transformer = FluxTransformer2DModel.from_pretrained(
    model_path
    , subfolder="transformer"
    , torch_dtype=torch.bfloat16
)
quantize_(transformer, int8_weight_only())

pipe = DiffusionPipeline.from_pretrained(
    model_path
    , transformer=transformer
    , torch_dtype=torch.bfloat16
)

pipe.enable_model_cpu_offload()

# %%
prompt = """\
A dreamy, soft-focus photograph capturing a romantic Jane Austen movie scene,
in the style of Agnes Cecile. Delicate watercolors, misty background,
Regency-era couple, tender embrace, period clothing, flowing dress, dappled sunlight,
ethereal glow, gentle expressions, intricate lace, muted pastels, serene countryside,
timeless romance, poetic atmosphere, wistful mood, look at camera.
"""

prompt_embeds, pooled_prompt_embeds = get_weighted_text_embeddings_flux1(
    pipe=pipe
    , prompt=prompt
)
image = pipe(
    prompt_embeds=prompt_embeds
    , pooled_prompt_embeds=pooled_prompt_embeds
    , width=1024 + 512
    , height=1024
    , num_inference_steps=50
    , guidance_scale=4.0
).images[0]

image.save("flux-dev2.png")
全gpu跑
速度很快:

这是代码:
bash展开代码import torch
from diffusers import FluxPipeline

# 指定模型下载目录为已有的目录
pipe = FluxPipeline.from_pretrained(
    "black-forest-labs/FLUX.1-dev",
    torch_dtype=torch.bfloat16,
    cache_dir="/ssd/xiedong/FLUX/"
)
pipe.to('cuda:0')

# pipe.enable_model_cpu_offload()  # 节省显存

prompt = "A cat holding a sign that says hello world"
image = pipe(
    prompt,
    height=1024,
    width=1024,
    guidance_scale=3.5,
    num_inference_steps=50,
    max_sequence_length=512,
).images[0]

image.save("flux-dev.png")
docker环境
制作docker环境
无法准确看到对应显卡,只能用docker切分显卡环境了。
制作docker环境:
bash展开代码docker pull pytorch/pytorch:2.4.1-cuda12.1-cudnn9-devel

docker run -it --gpus device=1 -v /ssd/xiedong/bizhi_generate_images:/ssd/xiedong/bizhi_generate_images -v /ssd/xiedong/FLUX:/ssd/xiedong/FLUX pytorch/pytorch:2.4.1-cuda12.1-cudnn9-devel bash

pip install torchao --extra-index-url https://download.pytorch.org/whl/cu121
apt update
apt install git vim curl wget -y
pip install git+https://github.com/xhinker/sd_embed.git@main
pip install git+https://github.com/huggingface/diffusers.git
pip install -U transformers accelerate sentencepiece peft


# 安装中文语言包
apt-get install -y locales
# 生成简体中文 UTF-8 语言环境
locale-gen zh_CN.UTF-8
# 设置默认语言环境为中文
export LANG=zh_CN.UTF-8

apt-get clean && rm -rf /var/lib/apt/lists/* /tmp/* /var/tmp/*

pip cache purge

docker commit b58e6e463809 kevinchina/deeplearning:flux

docker push kevinchina/deeplearning:flux
脚本
这个python脚本保存为x10_flux_all_gen_no_mutil.py
调用方法是:
python x10_flux_all_gen_no_mutil.py 0 0
python x10_flux_all_gen_no_mutil.py 1 1000
python x10_flux_all_gen_no_mutil.py 2 2000
就是数据分3分跑,每一份保存的其实点不一样,分别是0、1000、2000这样的保存其实点,我总的数据就1k多。
python展开代码import argparse
import torch
from diffusers import DiffusionPipeline
import os
import json
import gc
from sd_embed.embedding_funcs import get_weighted_text_embeddings_flux1


# 从JSON文件中读取所有response提示词
def read_prompts(file_path):
    with open(file_path, 'r') as file:
        data = json.load(file)
    return [entry['response'] for entry in data if entry['status'] == 'success']


# 创建保存图像的目录
def create_directory(directory_path):
    if not os.path.exists(directory_path):
        os.makedirs(directory_path)


# 保存提示词到文本文件
def save_prompt_to_txt(file_path, prompt):
    with open(file_path, 'w') as file:
        file.write(prompt)


# 生成图像
def generate_images(prompts, start_idx):
    model_path = "/ssd/xiedong/FLUX/models--black-forest-labs--FLUX.1-dev/snapshots/0ef5fff789c832c5c7f4e127f94c8b54bbcced44"

    pipe = DiffusionPipeline.from_pretrained(
        model_path
        , torch_dtype=torch.bfloat16
    )

    pipe.to('cuda:0')

    for i, prompt in enumerate(prompts):
        image_filename = f"img_flux/{start_idx + i:04d}.png"
        txt_filename = f"img_flux/{start_idx + i:04d}.txt"

        if os.path.exists(image_filename) and os.path.exists(txt_filename):
            continue

        prompt_embeds, pooled_prompt_embeds = get_weighted_text_embeddings_flux1(
            pipe=pipe
            , prompt=prompt
        )
        image = pipe(
            prompt_embeds=prompt_embeds
            , pooled_prompt_embeds=pooled_prompt_embeds
            , width=1024 + 512
            , height=1024
            , num_inference_steps=50
            , guidance_scale=4.0
        ).images[0]

        image.save(image_filename)
        save_prompt_to_txt(txt_filename, prompt)

        print(f"GPU cuda:0: Saved image {image_filename} and prompt text {txt_filename}")

        gc.collect()
        torch.cuda.empty_cache()


if __name__ == "__main__":
    parser = argparse.ArgumentParser(description='Run app.py with GPU')
    parser.add_argument('gpu_index', type=int, help='The index of the GPU (e.g. 0, 1, 2 for cuda:0, cuda:1, cuda:2)')
    parser.add_argument('start_idx', type=int, help='start_idx')
    args = parser.parse_args()

    # JSON文件路径
    json_file = 'res_answer.json'
    prompts = read_prompts(json_file)

    # 创建保存图像和文本文件的目录
    output_dir = 'img_flux'
    create_directory(output_dir)

    # 根据显卡编号将提示词等分
    num_gpus = 3  # 假设有3个显卡
    prompts_split = [prompts[i::num_gpus] for i in range(num_gpus)]

    # 选取当前GPU要处理的那一部分提示词
    selected_prompts = prompts_split[args.gpu_index]

    # 开始生成图像,传入与该GPU对应的提示词部分
    generate_images(selected_prompts, start_idx=args.start_idx)
跑镜像
显卡0
bash展开代码docker run -it --gpus device=0 -v /ssd/xiedong/bizhi_generate_images:/ssd/xiedong/bizhi_generate_images -v /ssd/xiedong/FLUX:/ssd/xiedong/FLUX kevinchina/deeplearning:flux bash

cd /ssd/xiedong/bizhi_generate_images

python x10_flux_all_gen_no_mutil.py 0 0
显卡1
bash展开代码docker run -it --gpus device=1 -v /ssd/xiedong/bizhi_generate_images:/ssd/xiedong/bizhi_generate_images -v /ssd/xiedong/FLUX:/ssd/xiedong/FLUX kevinchina/deeplearning:flux bash

cd /ssd/xiedong/bizhi_generate_images

python x10_flux_all_gen_no_mutil.py 1 1000
显卡2
bash展开代码docker run -it --gpus device=2 -v /ssd/xiedong/bizhi_generate_images:/ssd/xiedong/bizhi_generate_images -v /ssd/xiedong/FLUX:/ssd/xiedong/FLUX kevinchina/deeplearning:flux bash

cd /ssd/xiedong/bizhi_generate_images

python x10_flux_all_gen_no_mutil.py 2 2000


本文作者:Dong
本文链接:
版权声明:本博客所有文章除特别声明外,均采用 CC BY-NC。本作品采用《知识共享署名-非商业性使用 4.0 国际许可协议》进行许可。您可以在非商业用途下自由转载和修改,但必须注明出处并提供原作者链接。 许可协议。转载请注明出处!