目录
1 需求
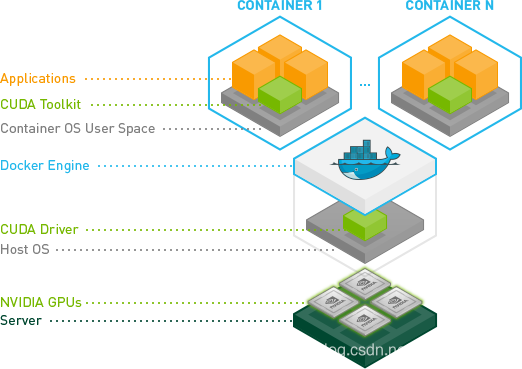
pytorch、tensorflow、mxnet等深度学习框架使用GPU的时候,不一样的版本会有一些CUDA要求,所以环境一直是困扰,Docker推出后,NVIDIA基于Docker给出解决方案,答案就是NVIDIA Container Toolkit。
github链接:
https://github.com/NVIDIA/nvidia-docker
架构图:
2 安装
2.1 安装前需要知道
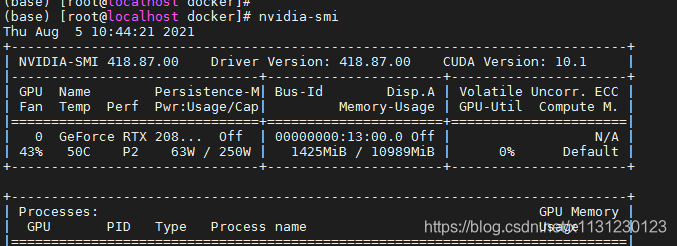
我的机器是centOS 7,显卡是2080TI 11G,上面有GPU驱动和CUDA。

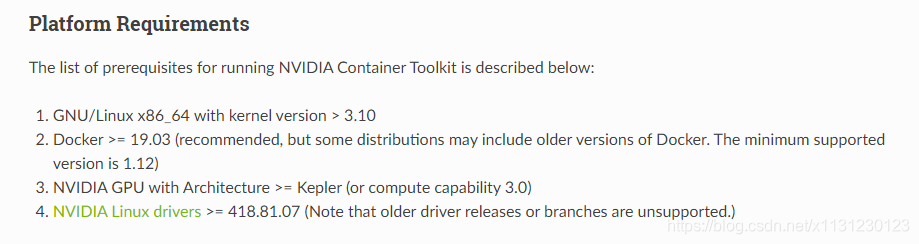
参考:https://docs.nvidia.com/datacenter/cloud-native/container-toolkit/install-guide.html#install-guide
必须要有英伟达GPU驱动,版本大于等于418.81.07。
安装必要包:
powershell展开代码sudo yum install -y tar bzip2 make automake gcc gcc-c++ vim pciutils elfutils-libelf-devel libglvnd-devel iptables
2.2 安装Docker
这样:
powershell展开代码sudo yum remove docker \
                  docker-client \
                  docker-client-latest \
                  docker-common \
                  docker-latest \
                  docker-latest-logrotate \
                  docker-logrotate \
                  docker-engine
sudo yum install -y yum-utils \
  device-mapper-persistent-data \
  lvm2
sudo yum-config-manager \
    --add-repo \
    http://mirrors.aliyun.com/docker-ce/linux/centos/docker-ce.repo
sudo yum install docker-ce docker-ce-cli containerd.io -y
sudo systemctl start docker
sudo docker run hello-world
2.3 安装NVIDIA Container Toolkit
Setup the stable repository and the GPG key:
powershell展开代码distribution=$(. /etc/os-release;echo $ID$VERSION_ID) \
   && curl -s -L https://nvidia.github.io/nvidia-docker/$distribution/nvidia-docker.repo | sudo tee /etc/yum.repos.d/nvidia-docker.repo
powershell展开代码sudo yum clean expire-cache
安装nvidia-docker2
powershell展开代码sudo yum install -y nvidia-docker2
重启
powershell展开代码sudo systemctl restart docker
听说Docker版本大于19,可以用yum install -y nvidia-container-toolkit 代替nvidia-docker2安装,我觉得都行。
安装nvidia-docker2后,可以vim /etc/docker/daemon.json看一下Docker的配置文件,是改写了的,重启Docker后生效了。
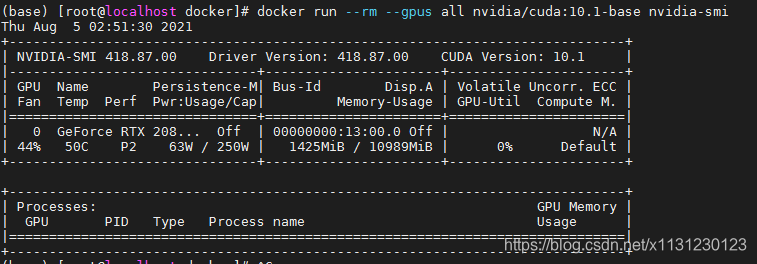
测试安装是否成功:
powershell展开代码docker run --rm --gpus all nvidia/cuda:10.1-base nvidia-smi
会看到:
3 总结
3.1 如何安装CUDA 11.0
官网安装后测试用的是CUDA11,我没有执行成功,那么如何才能成功?
powershell展开代码sudo docker run --rm --gpus all nvidia/cuda:11.0-base nvidia-smi
官网的GPU驱动版本是:
powershell展开代码NVIDIA-SMI 450.51.06 Driver Version: 450.51.06 CUDA Version: 11.0
所以在官网查看GPU驱动和CUDA对应,找到了官网的兼容性介绍:
https://docs.nvidia.com/deploy/cuda-compatibility/
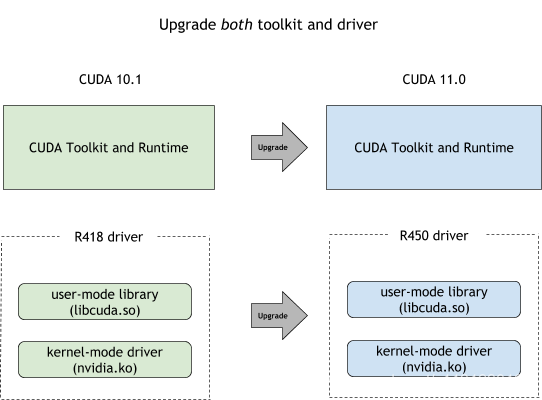
所以对于我来说,机器上的CUDA和cudnn不用改动,但我升级gpu driver是OK的,向下兼容,一直保持gpu driver是最新版本是OK的。
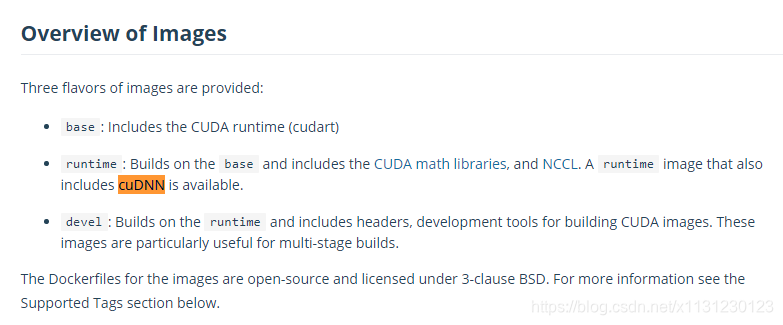
此外Docker Hub的介绍也很明确,NVIDIA推出的镜像包含CUDA和cuDNN。
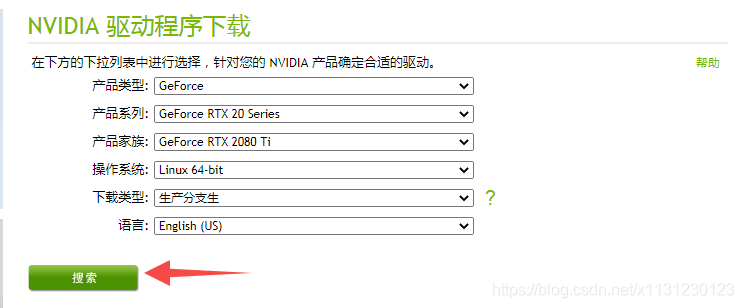
3.2 如何升级gpu driver?
首先搜索显卡能用得了的驱动:https://www.nvidia.cn/Download/index.aspx?lang=cn#,然后下载下来即可。
依次执行:
powershell展开代码chmod a+x NVIDIA-Linux-x86_64-465.31.run  #修改权限
./NVIDIA-Linux-x86_64-465.31.run --uninstall #卸载原有版本
NVIDIA-Linux-x86_64-465.31.run #安装新版本
3.3 升级gpu driver报错
报错:
展开代码An NVIDIA kernel module 'nvidia-uvm' appears to already be loaded in your kernel. This may be because it is in use (for example, by an X server, a CUDA program, or the NVIDIA Persistence Daemon), but this may also happen if your kernel was configured without support for module unloading. Please be sure to exit any programs that may be using the GPU(s) before attempting to upgrade your driver. If no GPU-based programs are running, you know that your kernel supports module unloading, and you still receive this message, then an error may have occurred that has corrupted an NVIDIA kernel module's usage count, for which the simplest remedy is to reboot your computer.
怎么办?
原因是卸载的时候有别的程序占用显卡不放,所以无法安装新的显卡驱动。先停止那些占用就可以了。
参见:https://haoyu.love/blog549.html
依次执行:
powershell展开代码fuser -v /dev/nvidia*
fuser -v /dev/nvidia* | grep -o -E '[0-9]+' | xargs kill -9
4 容器:深度学习环境
4.1 实践目标
目标,在容器里用conda安装上torch gpu 1.7.1:
powershell展开代码# CUDA 11.0
conda install pytorch==1.7.1 torchvision==0.8.2 torchaudio==0.7.2 cudatoolkit=11.0 -c pytorch
4.2 找到合适的devel镜像
NVIDIA发布的devel镜像在之前图看到过,里面包含了runtime,还有一些别的,相当于最全了!
找到镜像,https://hub.docker.com/r/nvidia/cuda/tags?page=1&ordering=last_updated&name=11.0
pull镜像:
powershell展开代码docker pull nvidia/cuda:11.0.3-devel-centos7
dockerpull 过慢,给一个阿里镜像。
Docker阿里镜像:
https://cr.console.aliyun.com/cn-hangzhou/instances/mirrors
4.3 运行容器
运行容器,用--gpus all参数去把宿主机资源带入容器中,此时nvidia-docker2在发挥作用:
powershell展开代码docker run -it -v /root:/define/root --gpus all 72978189a95a /bin/bash # 运行镜像,挂载卷方便文件传输
yum没镜像寸步难行
yum给镜像方法是这样:
powershell展开代码mv /etc/yum.repos.d/CentOS-Base.repo /etc/yum.repos.d/CentOS-Base.repo.backup
cd /etc/yum.repos.d/
wget http://mirrors.163.com/.help/CentOS7-Base-163.repo  # 配置为163源  可以不要这个 不执行这句
————————————————
版权声明:本文为CSDN博主「Q742971636」的原创文章,遵循CC 4.0 BY-SA版权协议,转载请附上原文出处链接及本声明。
原文链接:https://blog.csdn.net/x1131230123/article/details/115007154
宿主机文件移动到/root,然后在容器内移动到/etc/yum.repos.d:
powershell展开代码cp /define/root/CentOS-Base.repo /etc/yum.repos.d
安装wget等工具:
powershell展开代码yum install -y wget vim git
4.4 安装python
装miniconda:
powershell展开代码wget https://repo.anaconda.com/miniconda/Miniconda3-py38_4.9.2-Linux-x86_64.sh
sh Miniconda3-py38_4.9.2-Linux-x86_64.sh
source ~/.bashrc
装pytorch:
powershell展开代码# CUDA 11.0
conda install pytorch==1.7.1 torchvision==0.8.2 torchaudio==0.7.2 cudatoolkit=11.0 -c pytorch
4.5 用python程序测试环境
测试CUDA环境,写个py文件后执行,touchtest.py, vim test.py , 使用程序:
python展开代码import torch
flag = torch.cuda.is_available()
if flag:
    print("CUDA可使用")
else:
    print("CUDA不可用")
ngpu= 1
# Decide which device we want to run on
device = torch.device("cuda:0" if (torch.cuda.is_available() and ngpu > 0) else "cpu")
print("驱动为:",device)
print("GPU型号: ",torch.cuda.get_device_name(0))
执行程序 python test.py 后看到:

好,这样就成功了,能在容器里使用GPU了!
5 开始使用
退出容器,docker ps -a找到刚才容器id,使用docker commit 把容器变成镜像:
powershell展开代码docker commit -a "Kevin" -m "cuda11 pytorch1.7.1" 529cfd575f70 cuda11pytorch1_7_1:v1
使用docker images查看生成的镜像:

以后就能使用这个镜像进行开发:
powershell展开代码docker run -it -v /root:/define/root --gpus all 1d5c02b61178 /bin/bash # 运行镜像,挂载卷方便文件传输
更进一步把镜像保存为rar文件:
powershell展开代码docker save -o cuda11pytorch1_7_1.tar cuda11pytorch1_7_1:v1
加载本地镜像rar文件:
powershell展开代码docker load -i cuda11pytorch1_7_1.tar


本文作者:Dong
本文链接:
版权声明:本博客所有文章除特别声明外,均采用 CC BY-NC。本作品采用《知识共享署名-非商业性使用 4.0 国际许可协议》进行许可。您可以在非商业用途下自由转载和修改,但必须注明出处并提供原作者链接。 许可协议。转载请注明出处!